Teams decide what each user can see and change in your account. Create a team, choose its permissions, then put users in it. You can also keep a team to its own playlists, schedules, channels and media, and to the screens at the locations it works at.
Teams are included on the Premium and Enterprise plans.
The Administrators team
Every account has an Administrators team with full access to everything. It can’t be opened, edited or deleted. Only the account owner and members of this team can open User Management, the Tag manager and API Keys.
The teams list
- Click Account at the bottom of the menu on the left, then User Management.
- Open the Teams tab.
The list shows each team and, under Works at, the locations it works at: All locations, or the regions and locations it is limited to. Use Search Teams to find a team.
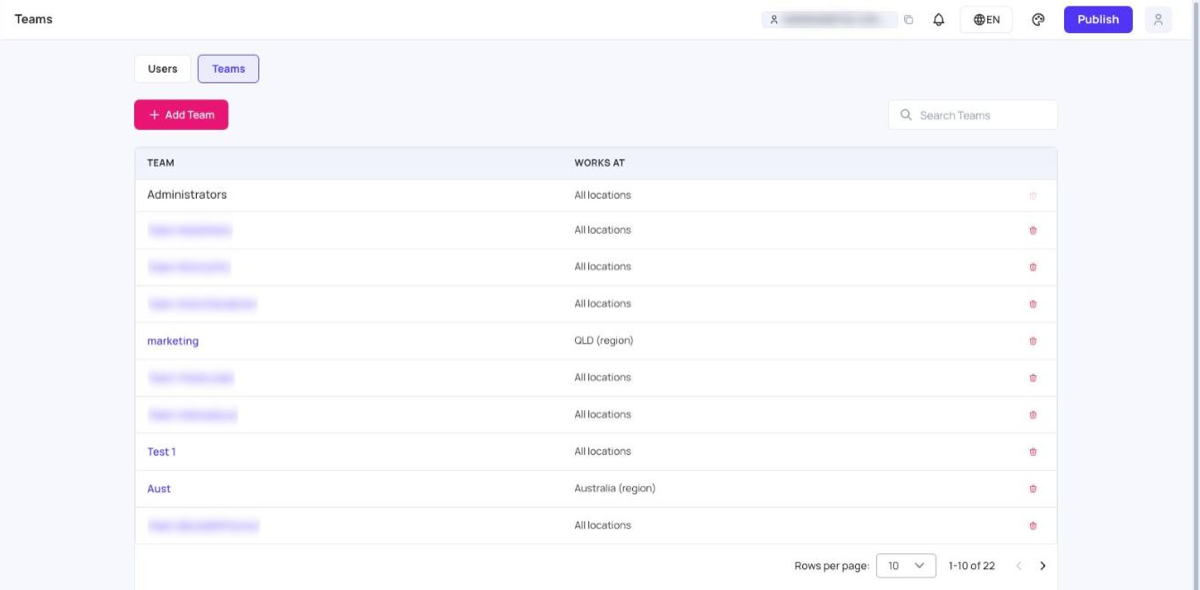
How to add a team
- On the Teams tab, click Add Team. The team’s page opens.
- Type the team’s name in Team name (3 to 50 characters).
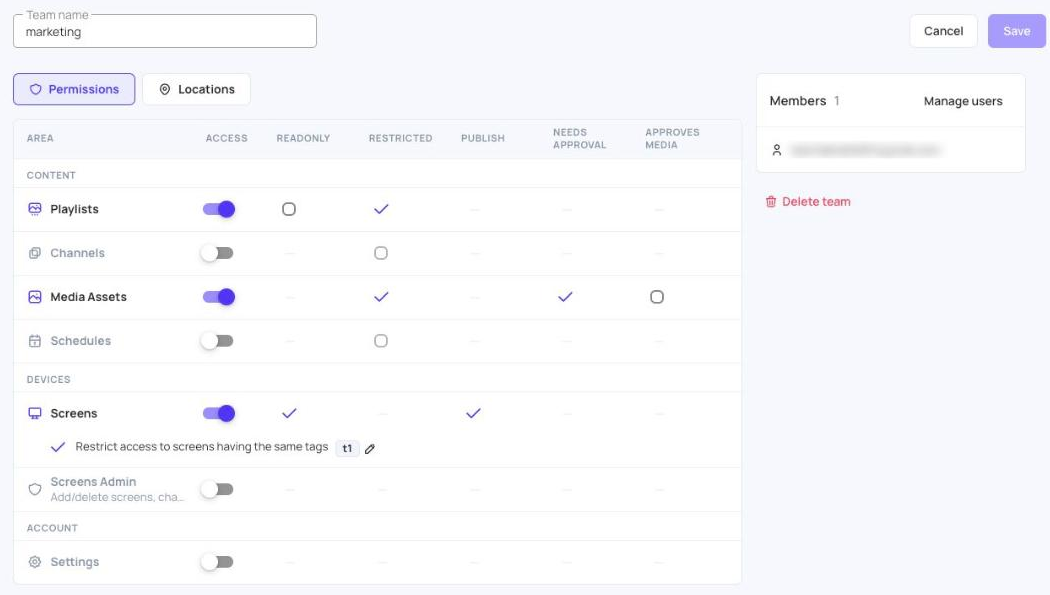
- On the Permissions tab, turn on Access for each area the team can use, then tick the extra options you want. See Permissions.
- If your account uses Locations, open the Locations tab and choose where the team works. See Choose where a team works.
- Click Add Team.
Permissions
Each row is an area of the account. Turn on Access to let the team use that area. The other columns are extra options for the area; hover over an option to read what it does. An option shows “—” when the area doesn’t have it, and stays greyed out until Access is on.
| Area | What it gives | Extra options |
|---|---|---|
| Playlists | Access to playlists. | Readonly: can view playlists but not change them. Restricted: only the team’s own playlists. |
| Channels | Access to channels. | Restricted: only the team’s own channels. |
| Media Assets | Access to Media Assets, also when adding content to a playlist. | Restricted: only the team’s own media and folders, its region’s, and what’s shared with it. Older media stays visible to all. Needs approval and Approves media: see Media approval. |
| Schedules | Access to schedules. | Restricted: only the team’s own schedules. |
| Screens | Access to screens: view them and set their content. | Readonly: can view screens but not change them; Assign to screens isn’t shown in playlists. Publish: can publish to their screens; without it the Publish button is disabled, Publish changes of this playlist isn’t shown in playlists, and Publish now in Assign to screens is greyed out. Restricted: only the team’s own groups and video walls. Restrict access to screens having the same tags: only screens with matching tags (see below). |
| Screens Admin | Add and delete screens, change screen tags, add licences, open billing and use proof of play. | — |
| Settings | Access to Settings. | — |
An area isn’t shown if your plan, or the account’s Feature Access settings, turn it off.
When Locations is on, the Restricted option for Screens is replaced by the Locations tab, unless the team already had it ticked.
Media approval
When your account has Media approval (Enterprise plan), the Media Assets row has two more options:
- Needs approval: media this team creates waits for approval before it can play.
- Approves media: members can approve or reject media waiting for review.
Both need Access on Media Assets. You can also set them for every team at once in Settings > Approvals.
Choose where a team works
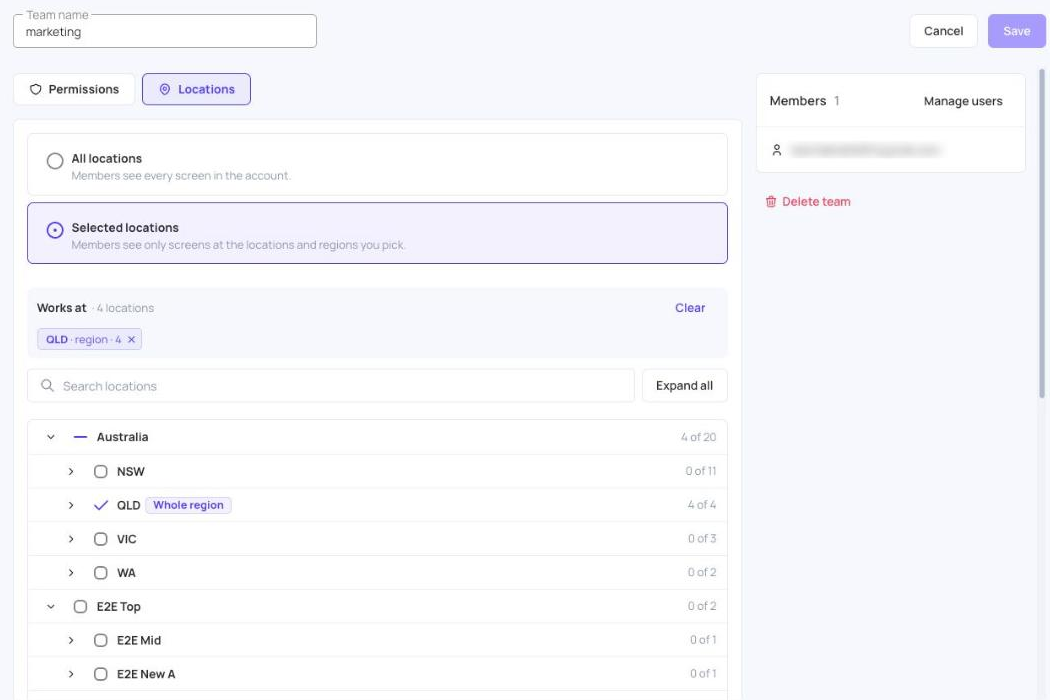
When Locations is on, each team page has a Locations tab. It decides which screens the team’s members see.
- Open the team, then the Locations tab.
- Choose one:
- All locations: members see every screen in the account.
- Selected locations: members see only screens at the locations and regions you pick.
- With Selected locations, tick the regions and locations in the list:
- Ticking a region picks the Whole region: every location in it, and every location added to it later.
- Use Search locations, or Expand all, to find a location.
- The bar at the top shows what is picked under Works at. Click the × on a chip to remove it, or Clear to remove everything.
- Click Save.
- A team with Selected locations must have at least one location or region.
- Screens with no location aren’t shown to a team with Selected locations.
- The Locations tab needs Access on Screens. If it is off, click Turn on Screens.
You can also add a team to a location from Settings > Locations: click the menu at the end of the location’s row, then Teams.
Give content to a team
A Restricted team only sees items that belong to it. Items that belong to no team are hidden from it.
- Playlists: choose the team in the Team field of the Add Playlist window, or later in the playlist’s settings under Team Access.
- Channels and video walls: choose the team in the Team field when you add them.
- Schedules and screen groups: they belong to the team of the person who creates them.
- Media and folders: use Team access in Media Assets to share them read-only or give them to a team. See Share media with other teams.
The Team field is shown to Administrators and to teams whose Playlists permission isn’t Restricted.
Restrict by tags
With Restrict access to screens having the same tags, the team only sees screens that share a tag with the team.
- Under Screens, tick Restrict access to screens having the same tags.
- Choose one or more tags.
- Give the same tags to the screens the team should see. See Tag manager.
A screen is shown if at least one of its tags is exactly the same as one of the team’s tags, capital letters included. A screen with no tags, or a team with no tags chosen, shows no screens.
Put users in a team
Open the Users tab and add a user, or click the edit icon next to a user and choose the Team. See Users.
The team’s page lists its Members. Click Manage users to go to the Users tab.
Edit or delete a team
- To change a team, click its row in the teams list. Change its name, permissions or locations, then click Save. The change applies to its members straight away. If you leave with unsaved changes, you are asked to Discard changes or Keep editing.
- To delete a team, open it and click Delete team, then Delete. You can also click the delete icon in the teams list and click Yes. A message confirms Team deleted.
A team that still has users can’t be deleted: move them to another team first.