This page shows how to configure Google Workspace Single Sign-On (SSO) with EasySignage using SAML 2.0. This allows users from your verified email domain to sign in to EasySignage with their Google Workspace account.
Prerequisites
- You have administrator access to your Google Workspace Admin console.
- You have administrator access to your EasySignage account.
- You have an email domain that belongs to your organization.
- You have a unique SP Entity ID value for EasySignage. This value is used in both Google Workspace and EasySignage, and it must be a valid identifier with no spaces.
Configure Google Workspace
Important: Sign in to Google Workspace as an administrator.
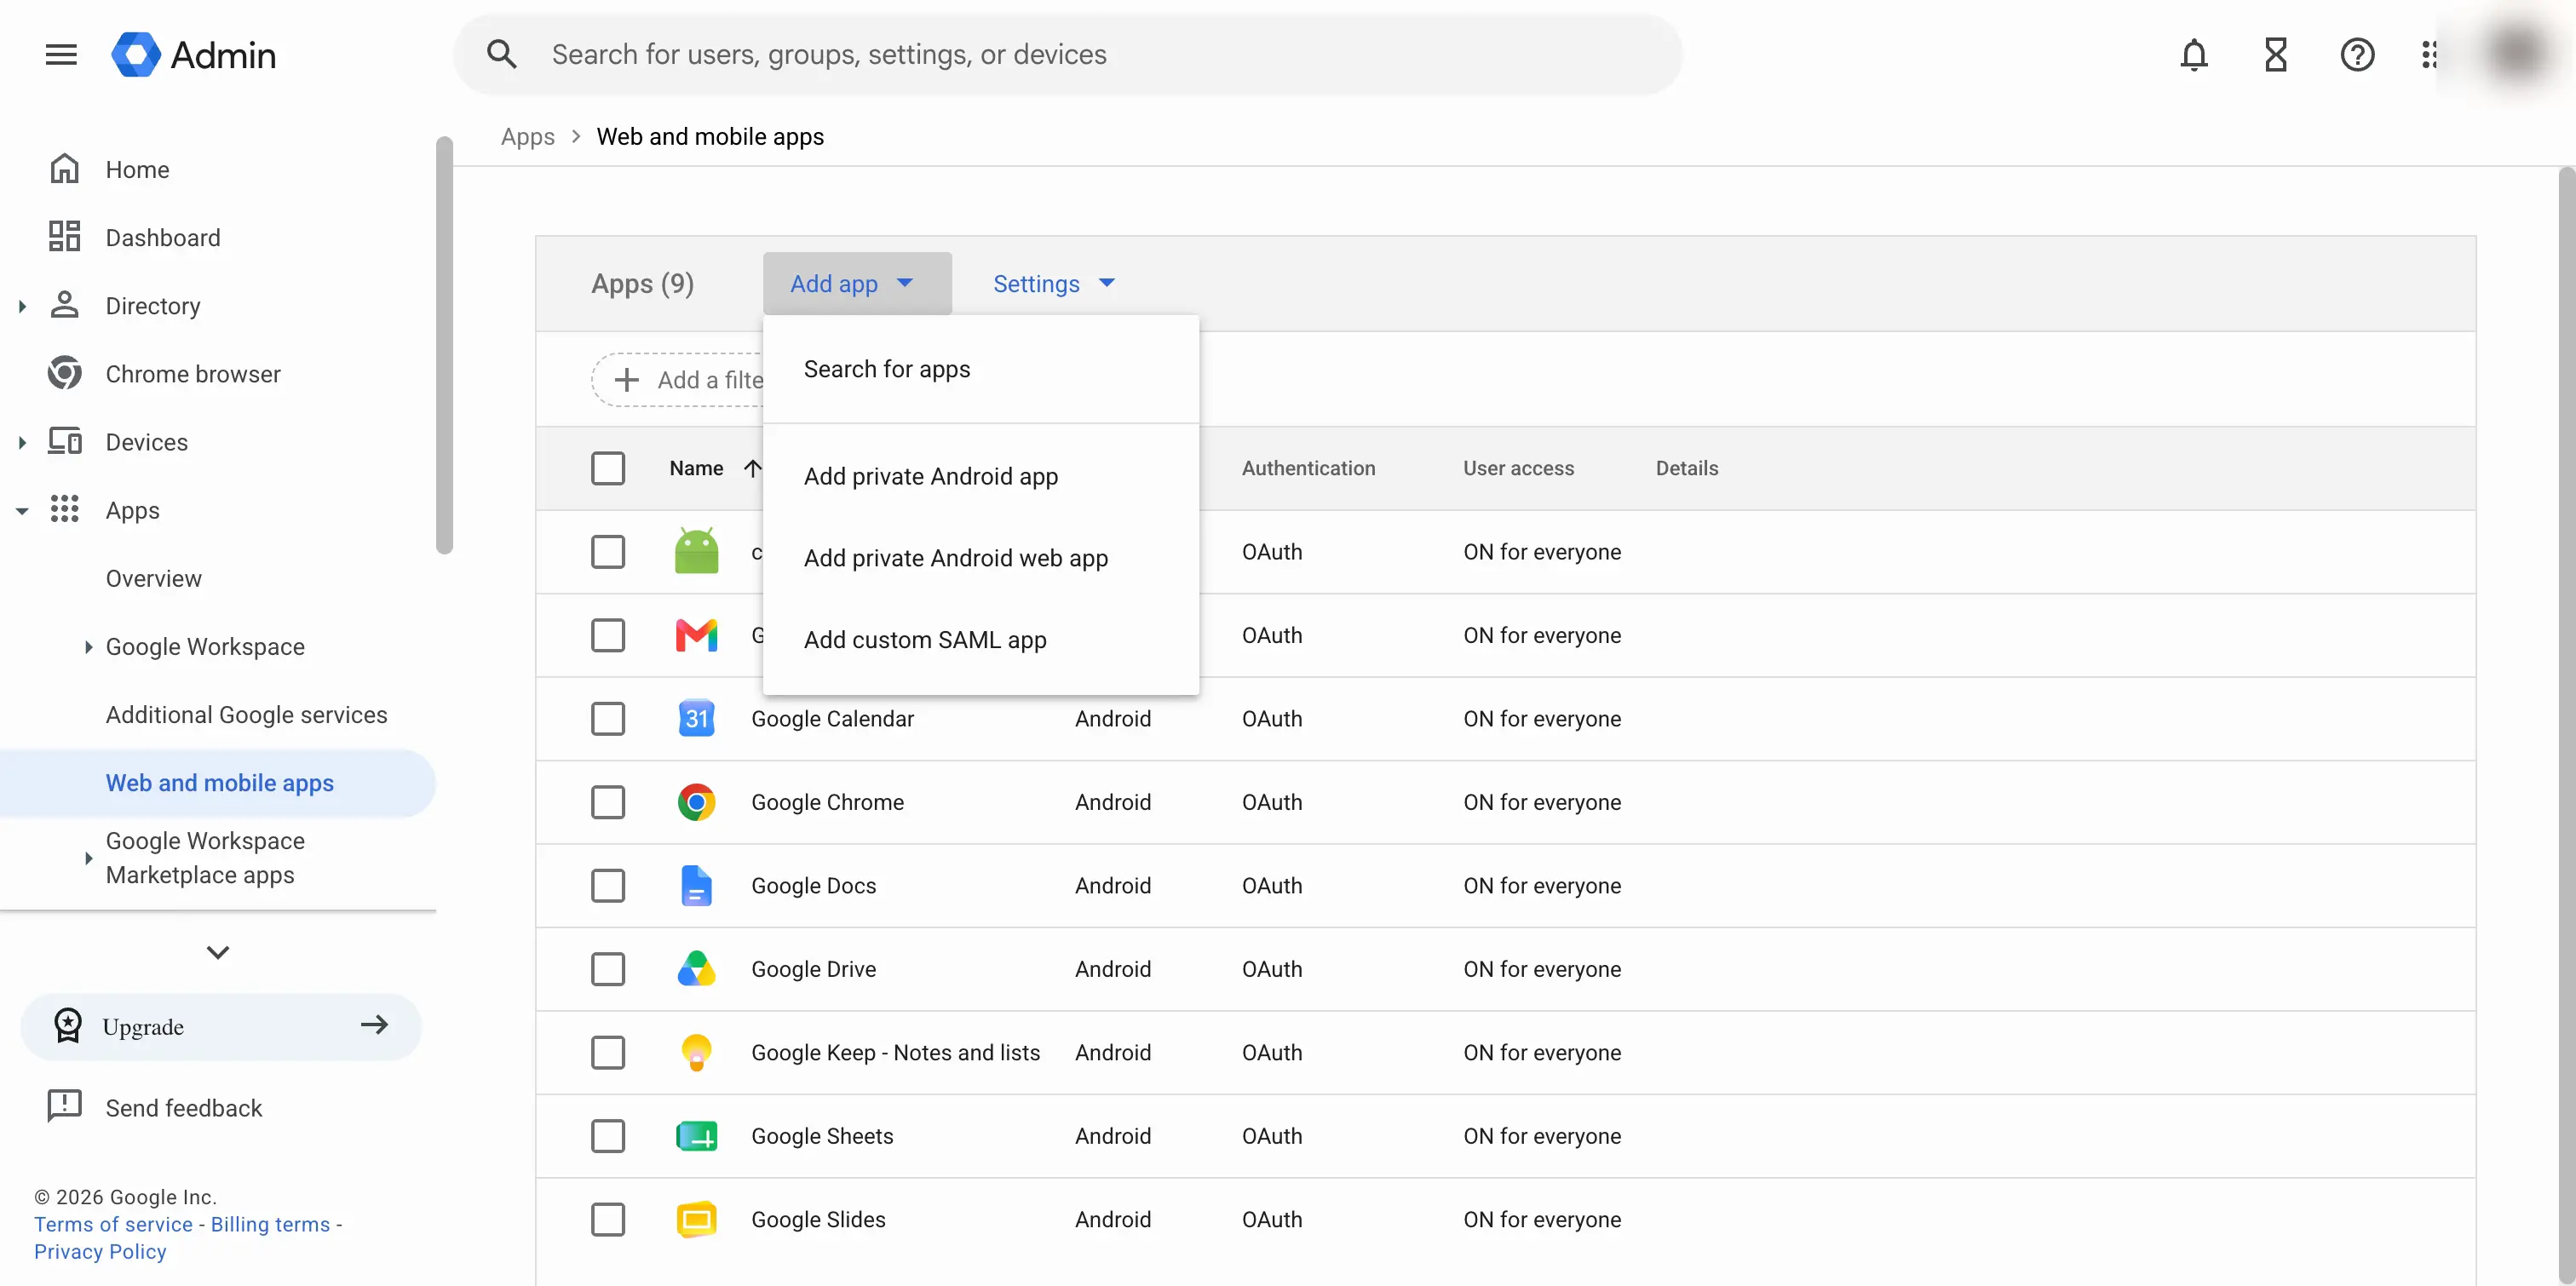
1. Add a Custom SAML App
- Open the Google Admin console.
- Go to Apps > Web and mobile apps.
- Click Add app.
- Select Add custom SAML app.
2. Enter the App Details
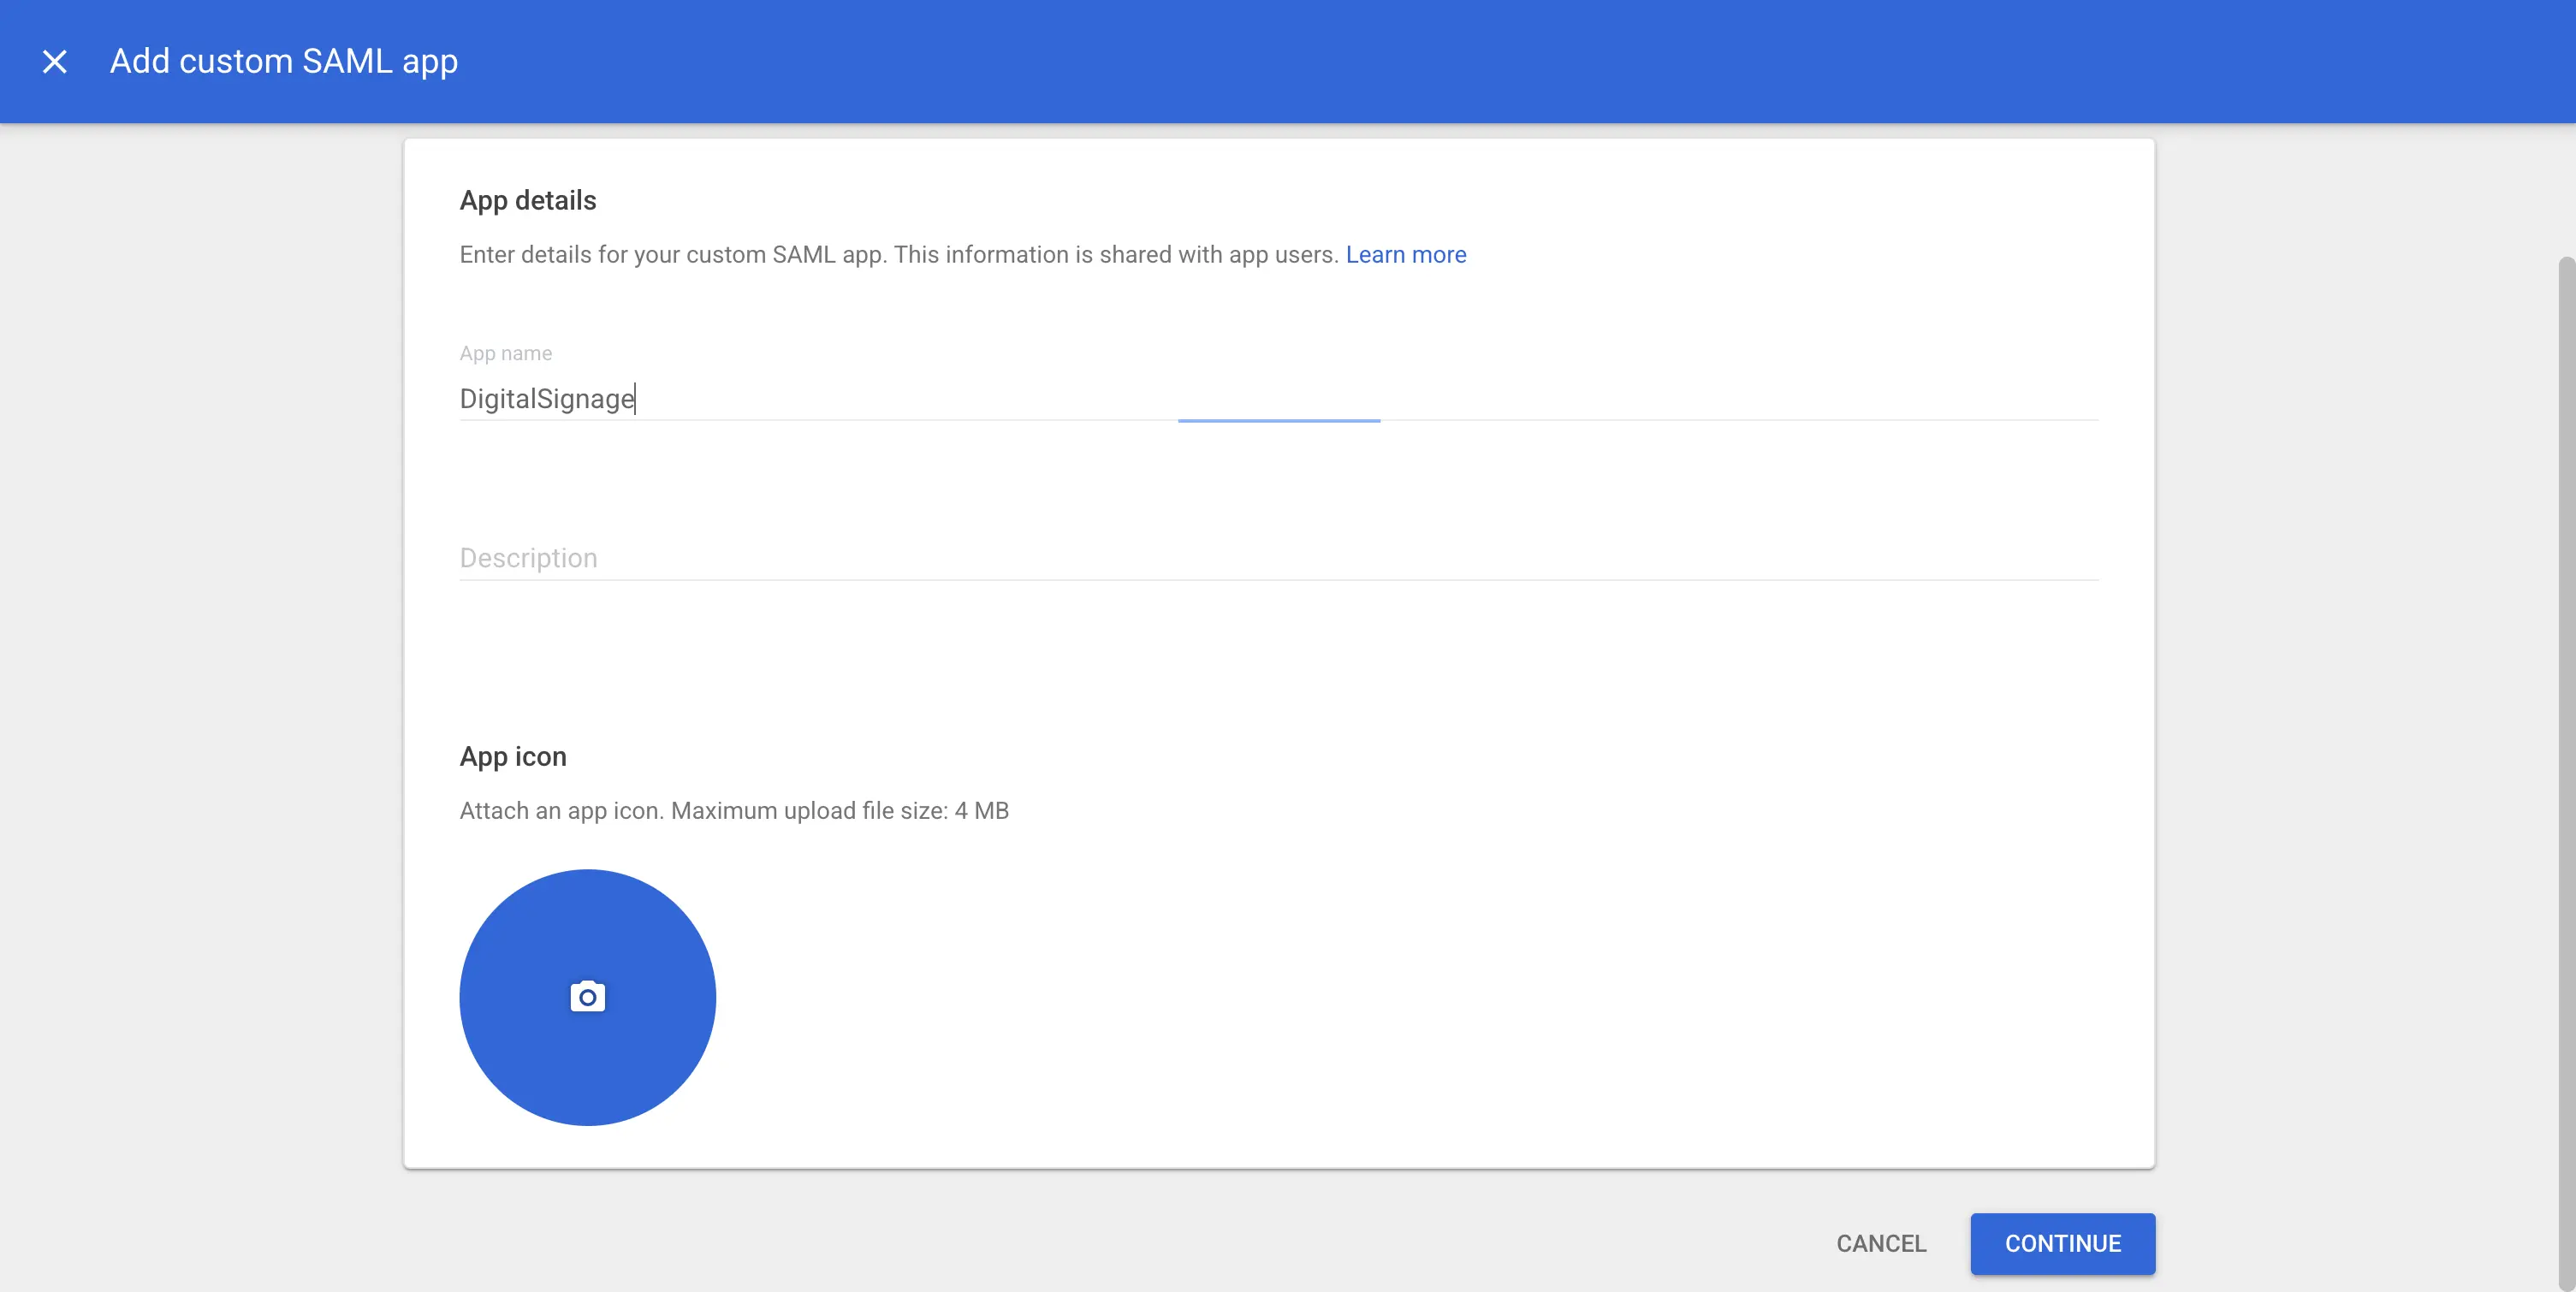
- Enter the app name, for example Digital Signage.
- Optionally, upload an app icon.
- Click Continue.
3. Copy the Google Identity Provider Details
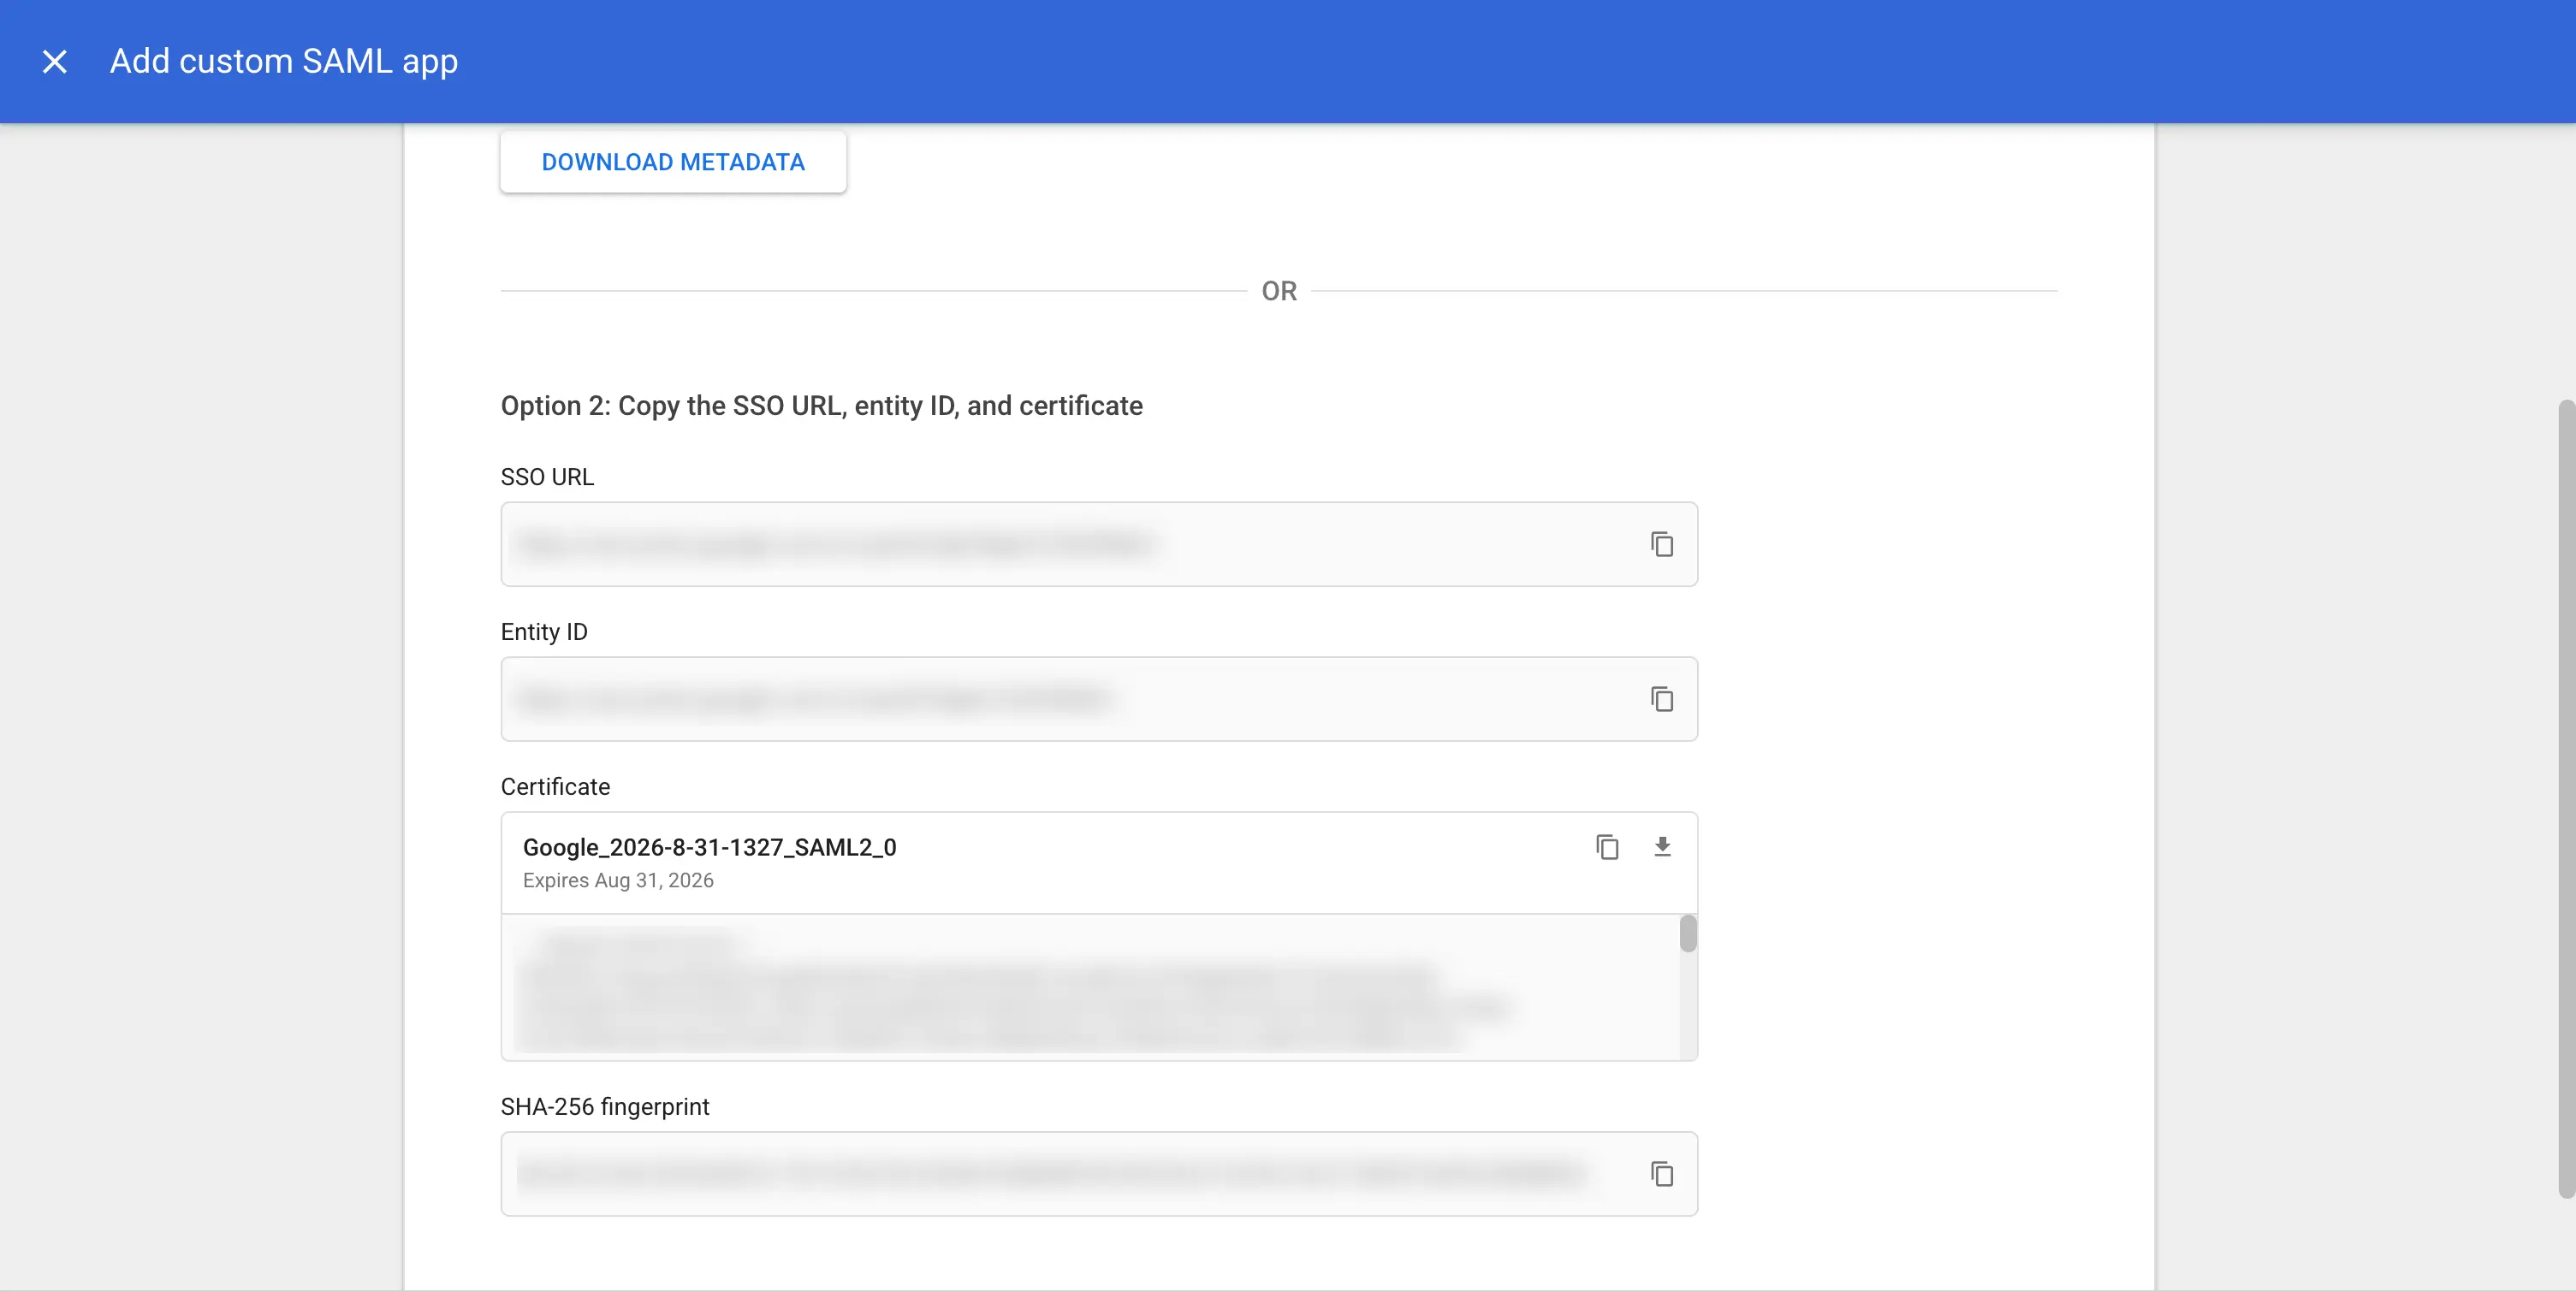
Google Workspace will show the Identity Provider details for your SAML app.
Copy the following values. You will add them later in EasySignage:
- SSO URL
- Entity ID
- Certificate
You can also download the metadata file if you want to keep a backup of the SAML configuration.
4. Add the Service Provider Details
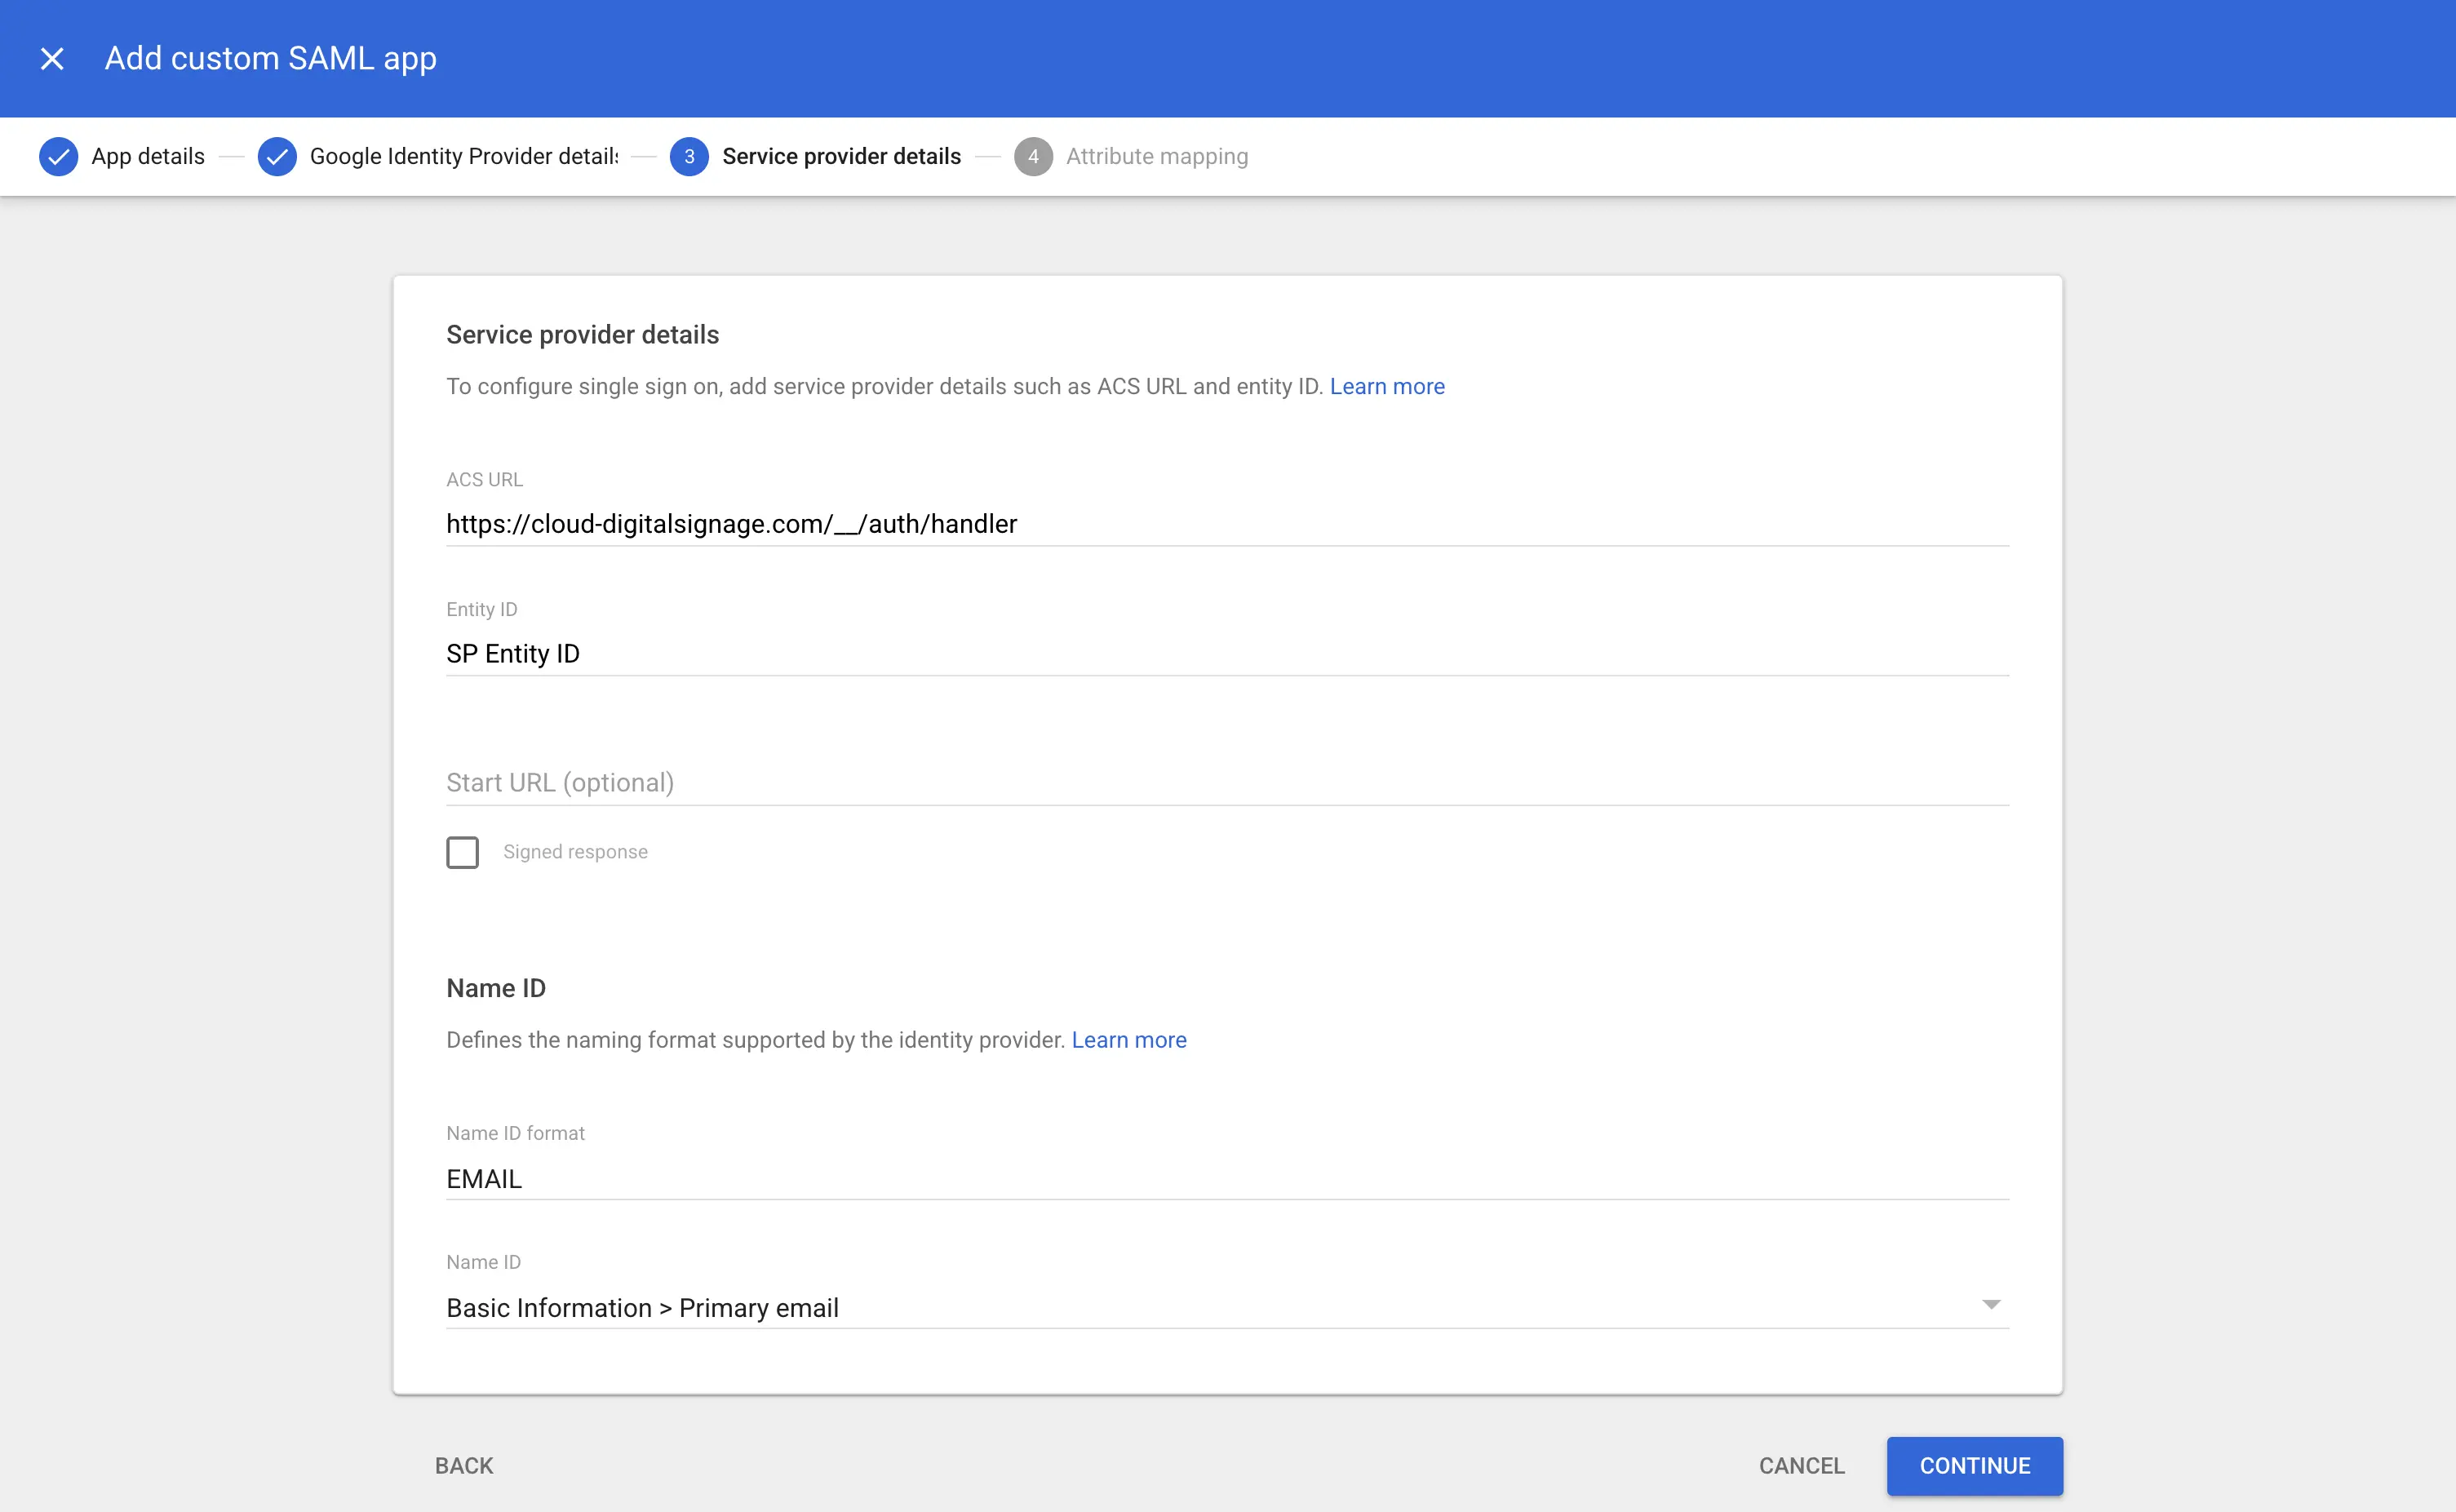
In the Service provider details step, enter the EasySignage service provider values:
ACS URL:
https://cloud-digitalsignage.com/__/auth/handlerEntity ID: enter the same SP Entity ID that you will use in EasySignage.
Example format:
digital-signage-sso-exampleUse letters, numbers, hyphens, or underscores only. Do not include spaces.
Do not use the Google Entity ID value in this field. The Google Entity ID is added later in EasySignage as the IdP Entity ID.
Leave Start URL empty unless your administrator provides one.
Leave Signed response unchecked.
Set Name ID format to EMAIL.
Set Name ID to Basic Information > Primary email.
Click Continue.
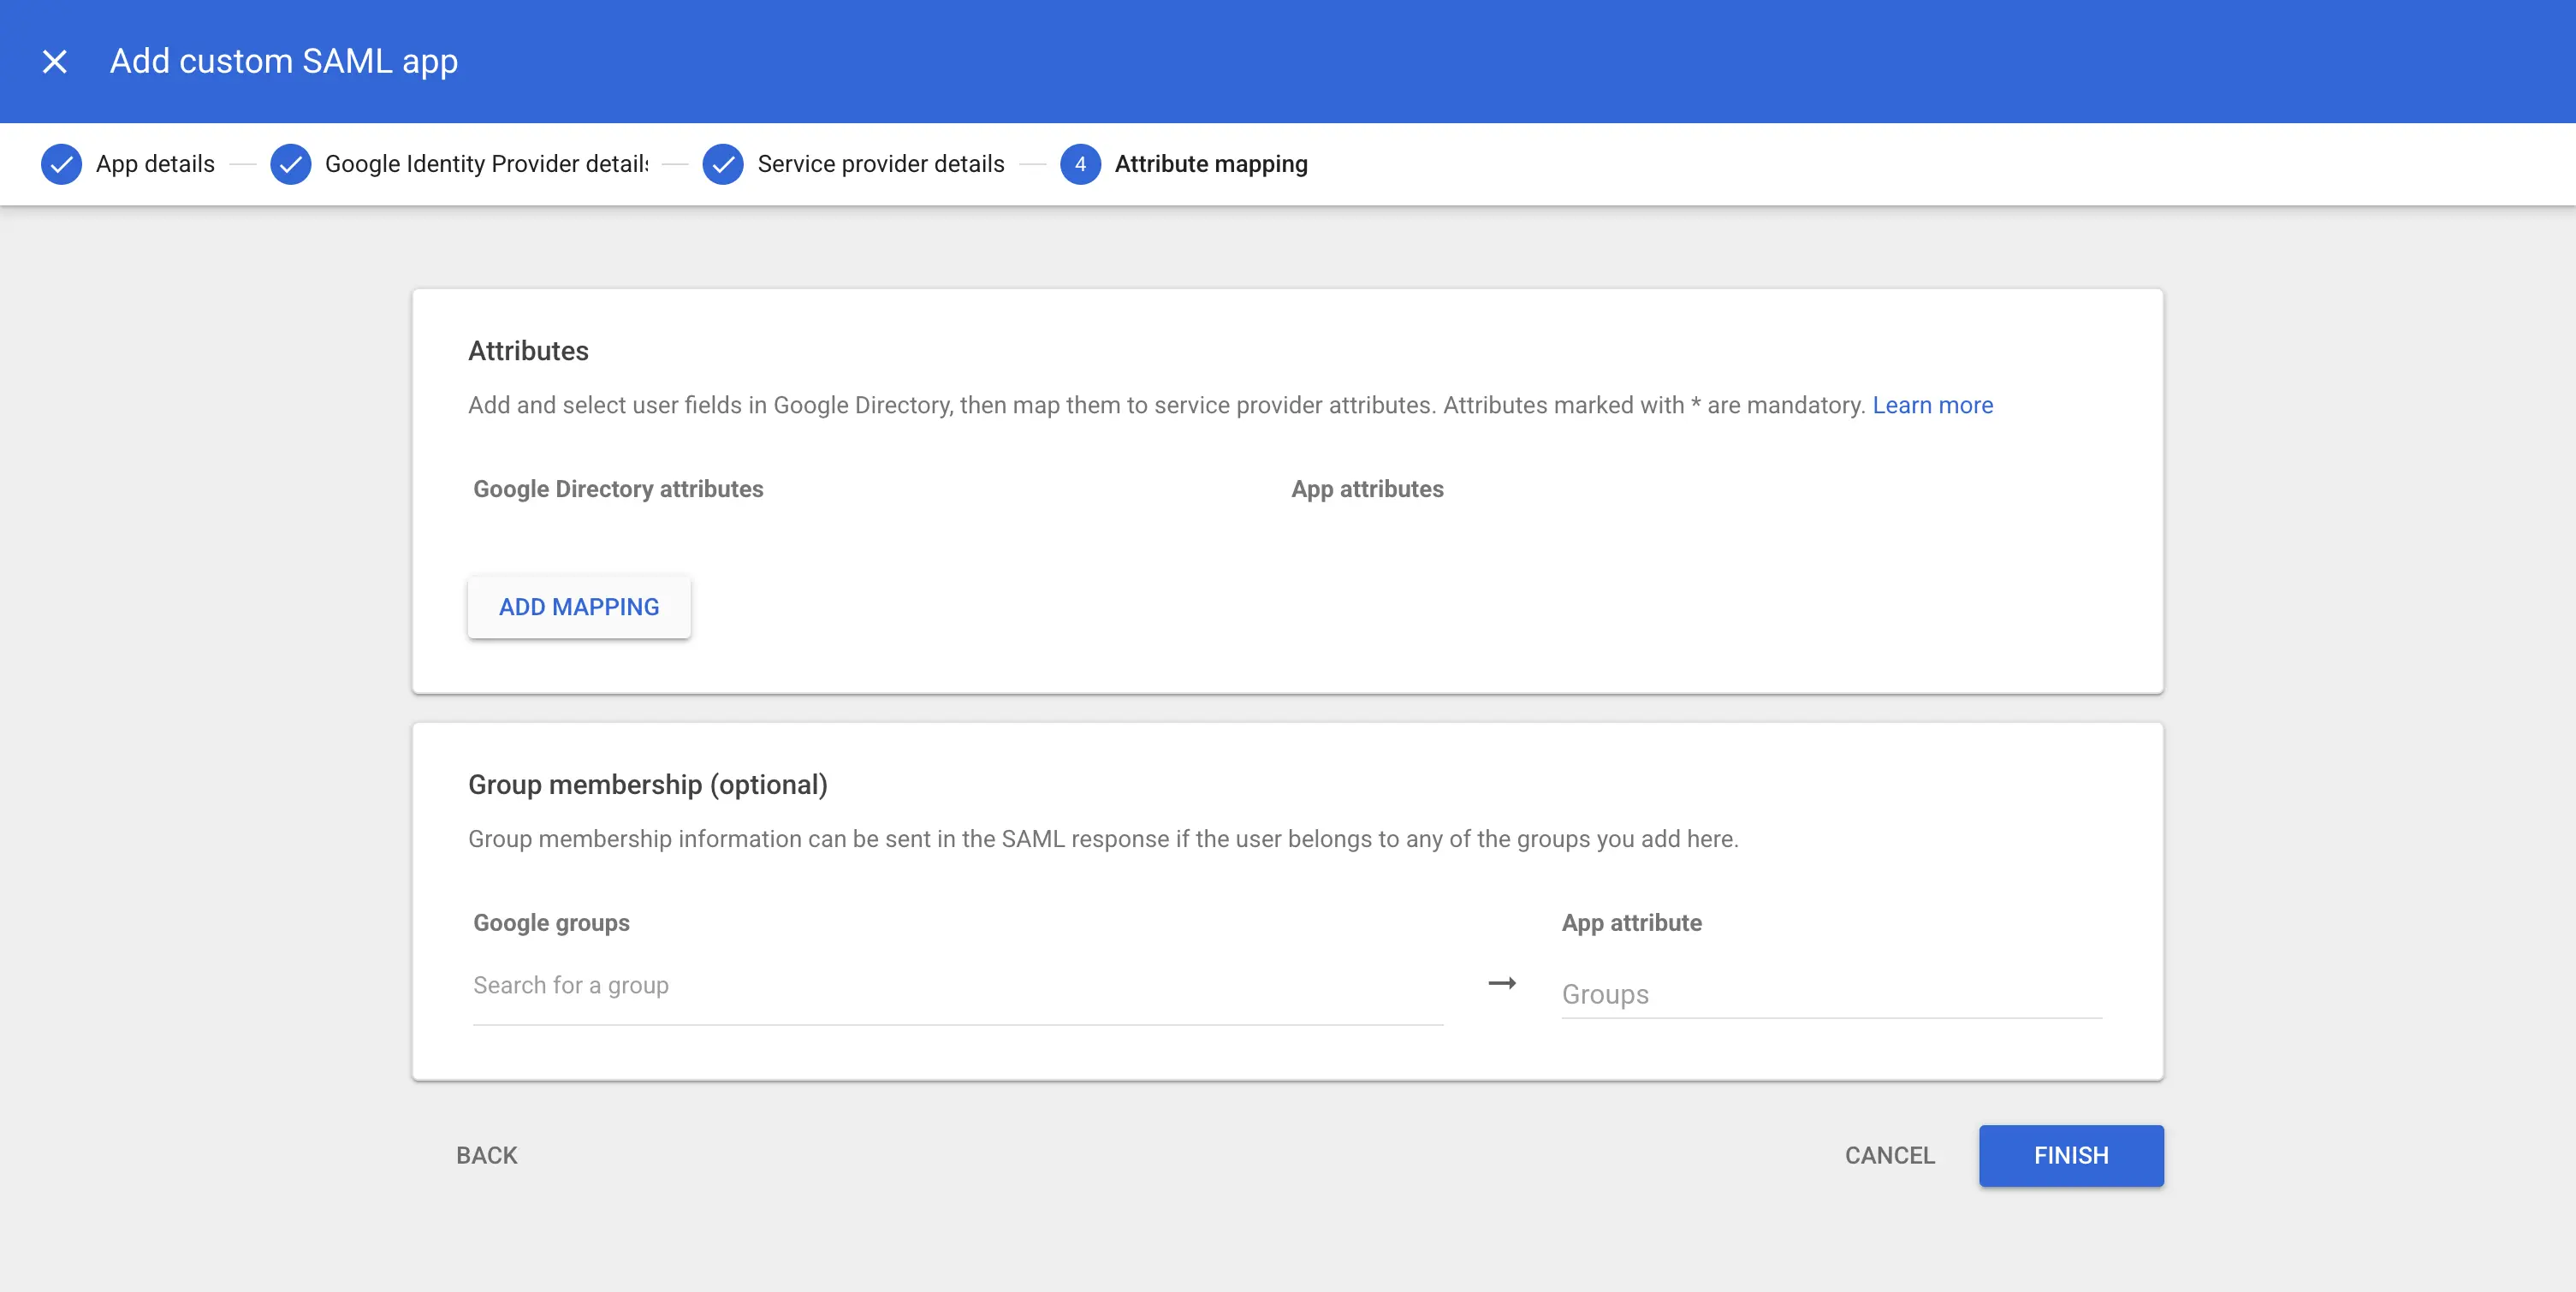
5. Configure Attribute Mapping
Attribute mapping is optional for the basic SSO setup.
- You can leave the attribute mapping empty.
- If your organization uses groups, you can add group membership and map it to Groups.
- Click Finish.
6. Enable User Access
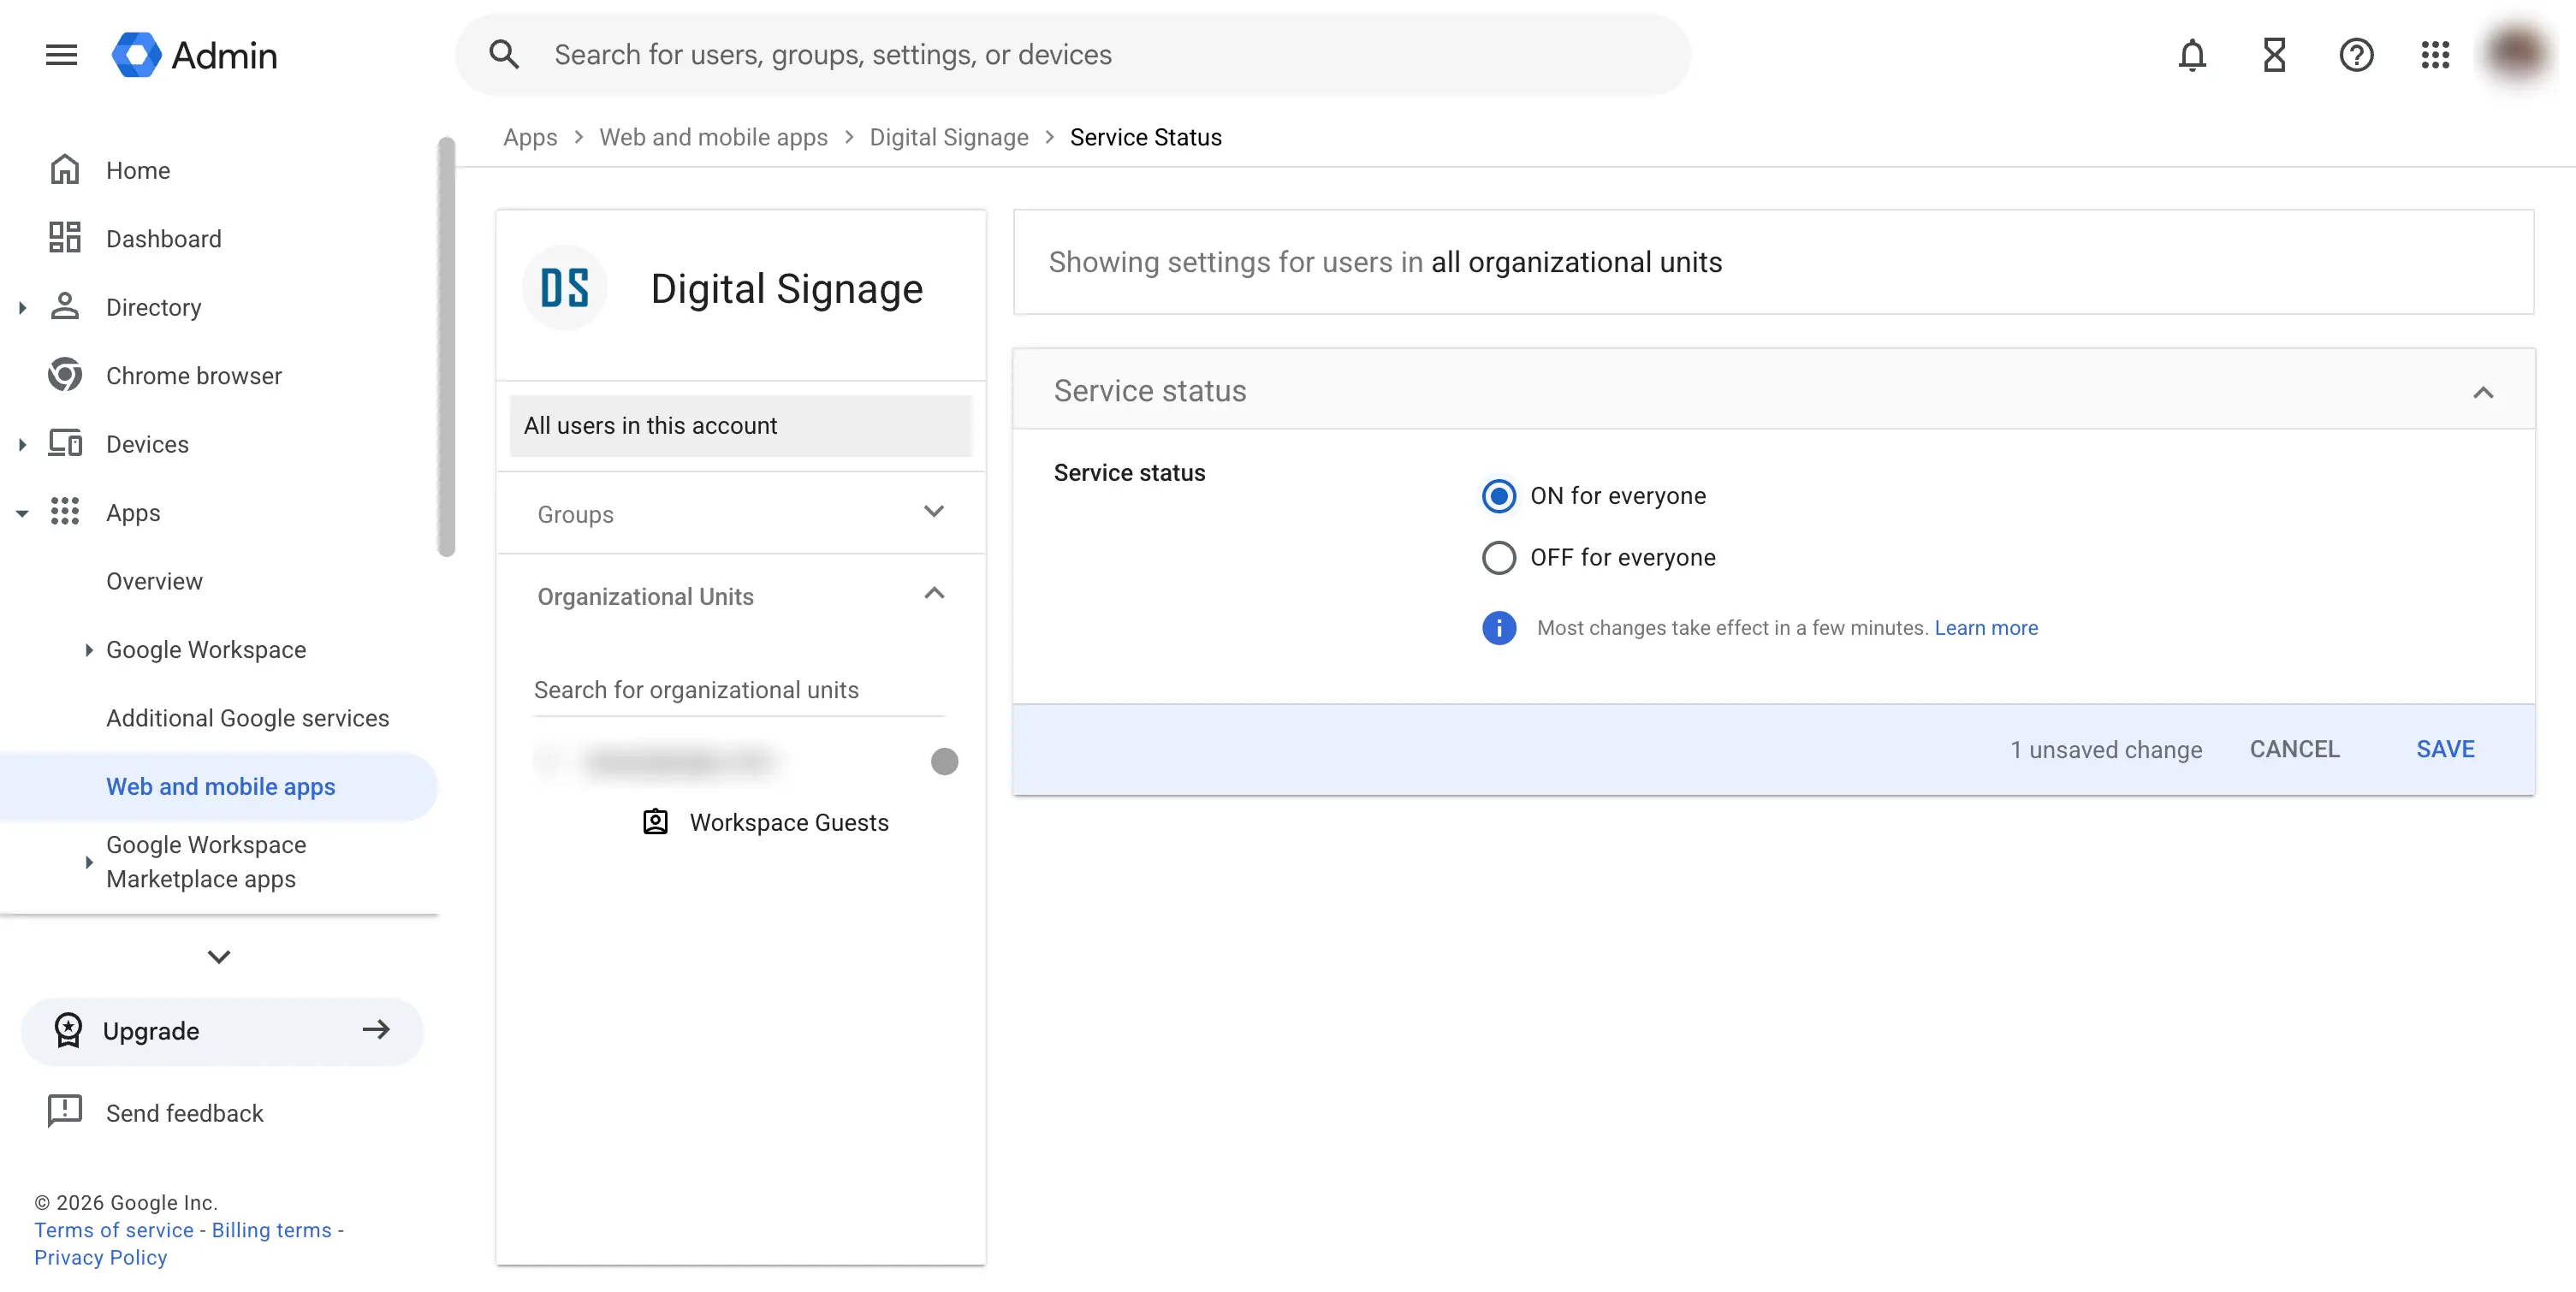
After the app is created, it may be OFF for everyone by default.
- Open the User access section.
- Select the organizational unit or group that should use SSO.
- Choose ON for everyone.
- Click Save.
Google Workspace changes usually take effect in a few minutes, but may take longer depending on your Google Workspace configuration.
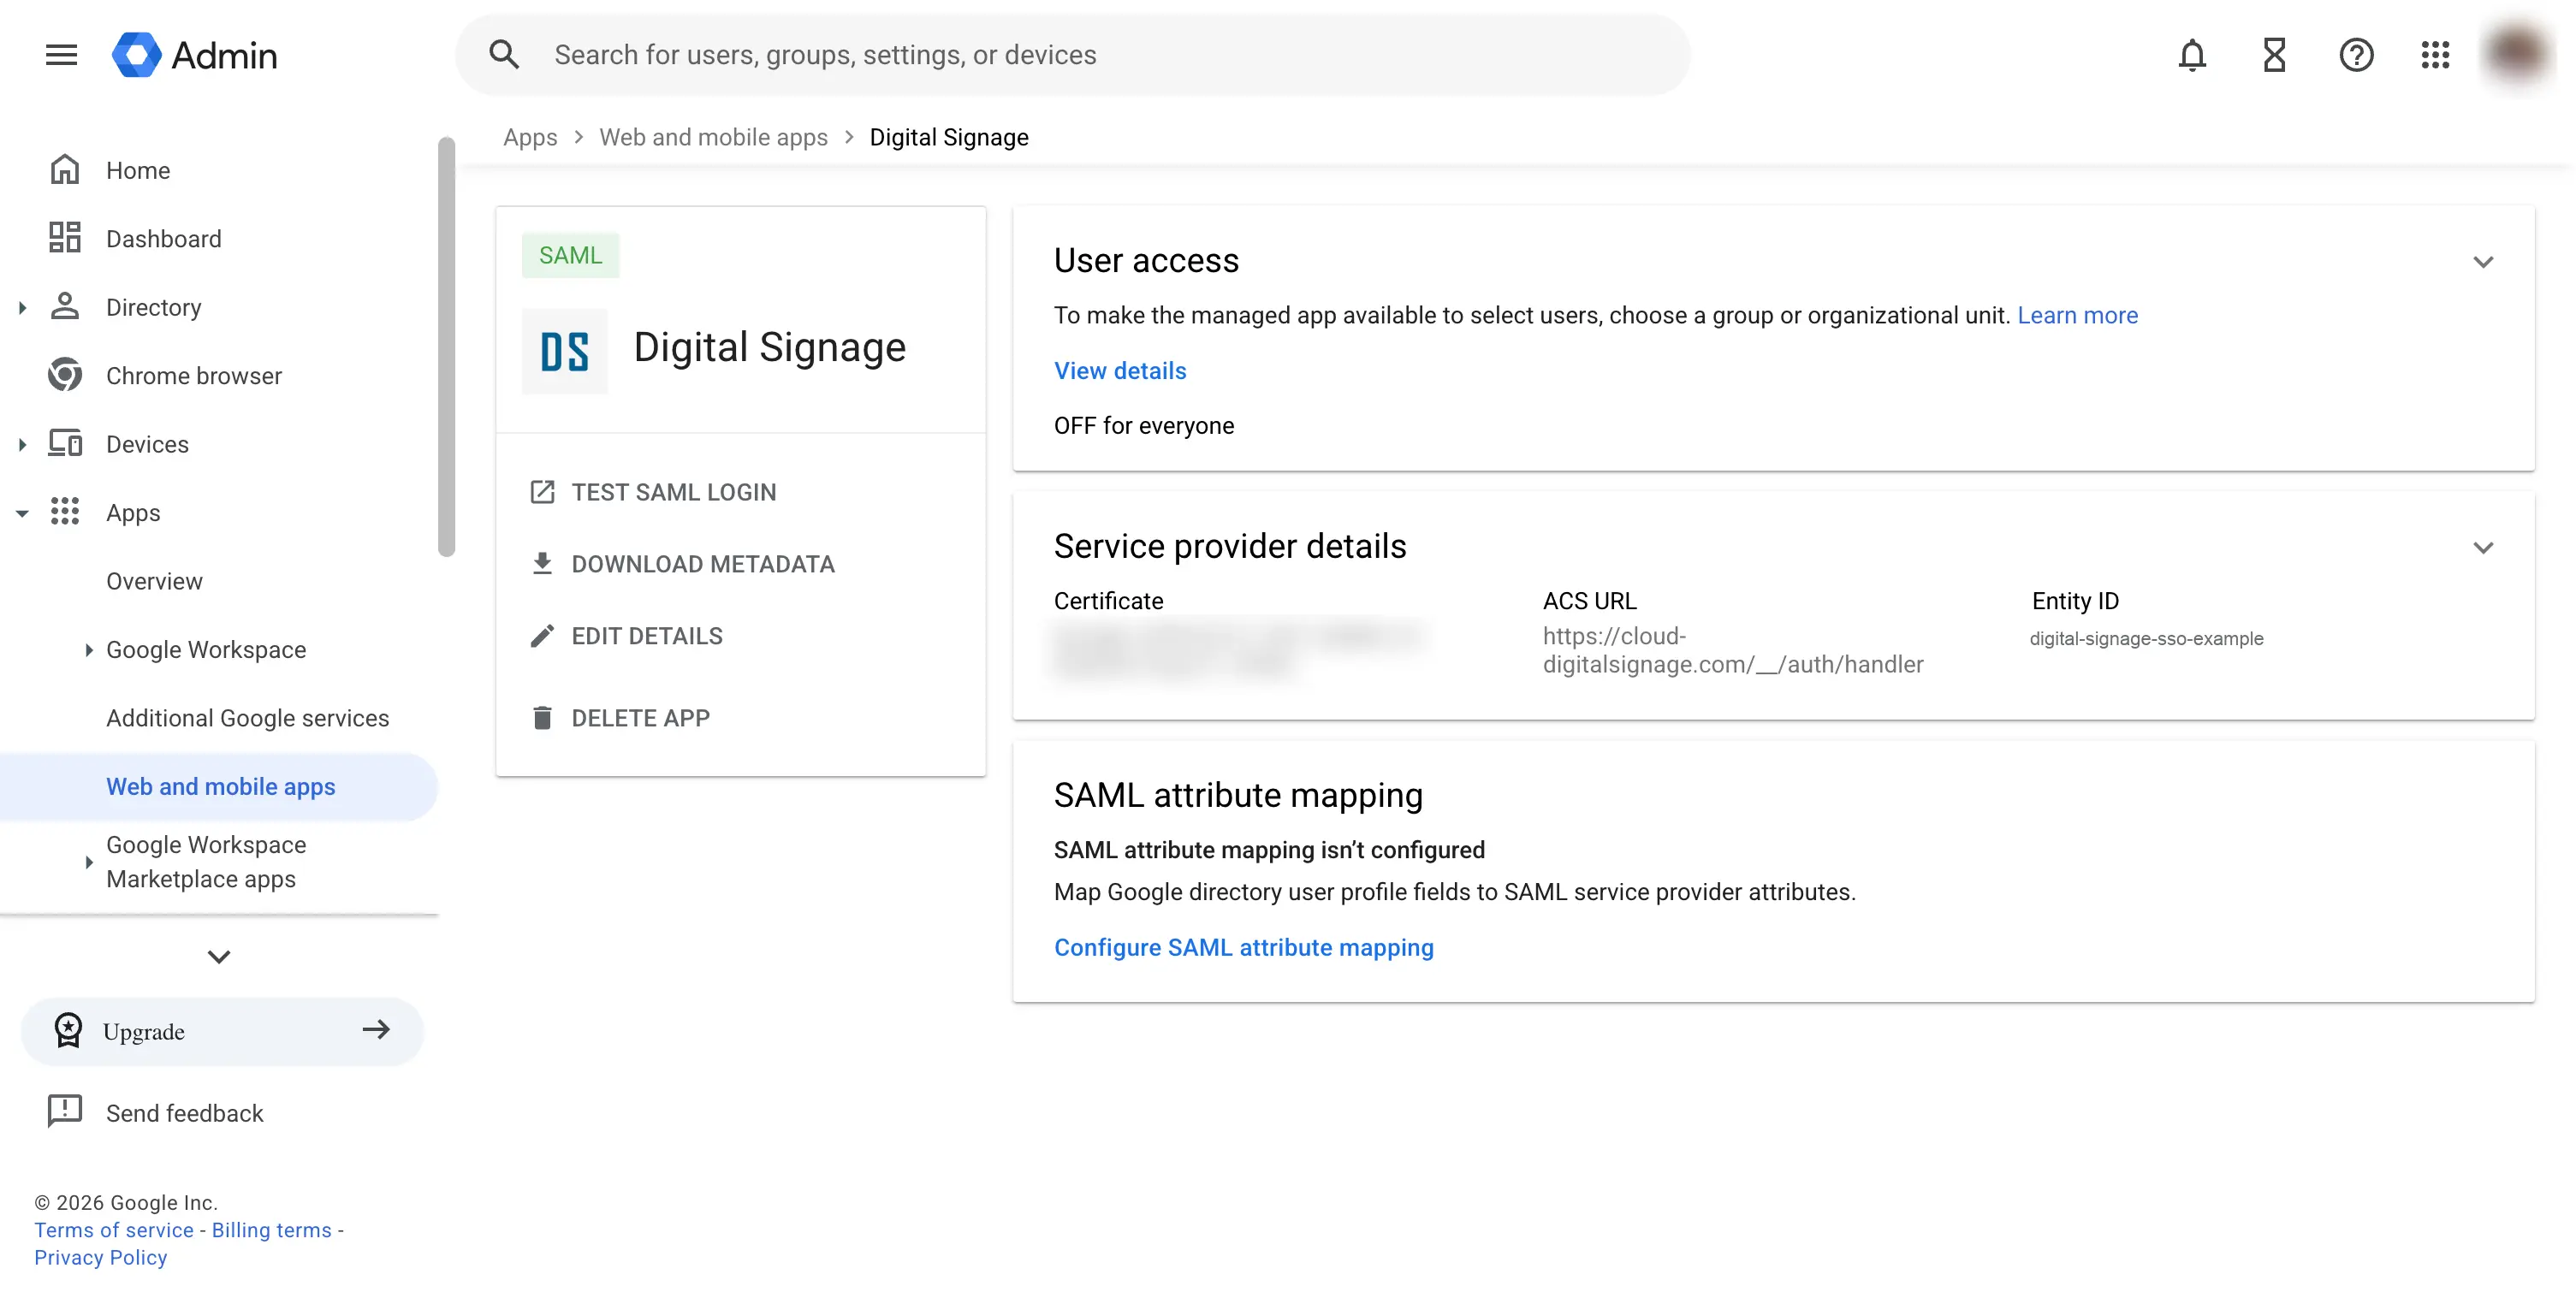
Your Google Workspace SAML app should now appear in the app details page.
Configure EasySignage
After creating the SAML app in Google Workspace, add the Google Identity Provider details in EasySignage.
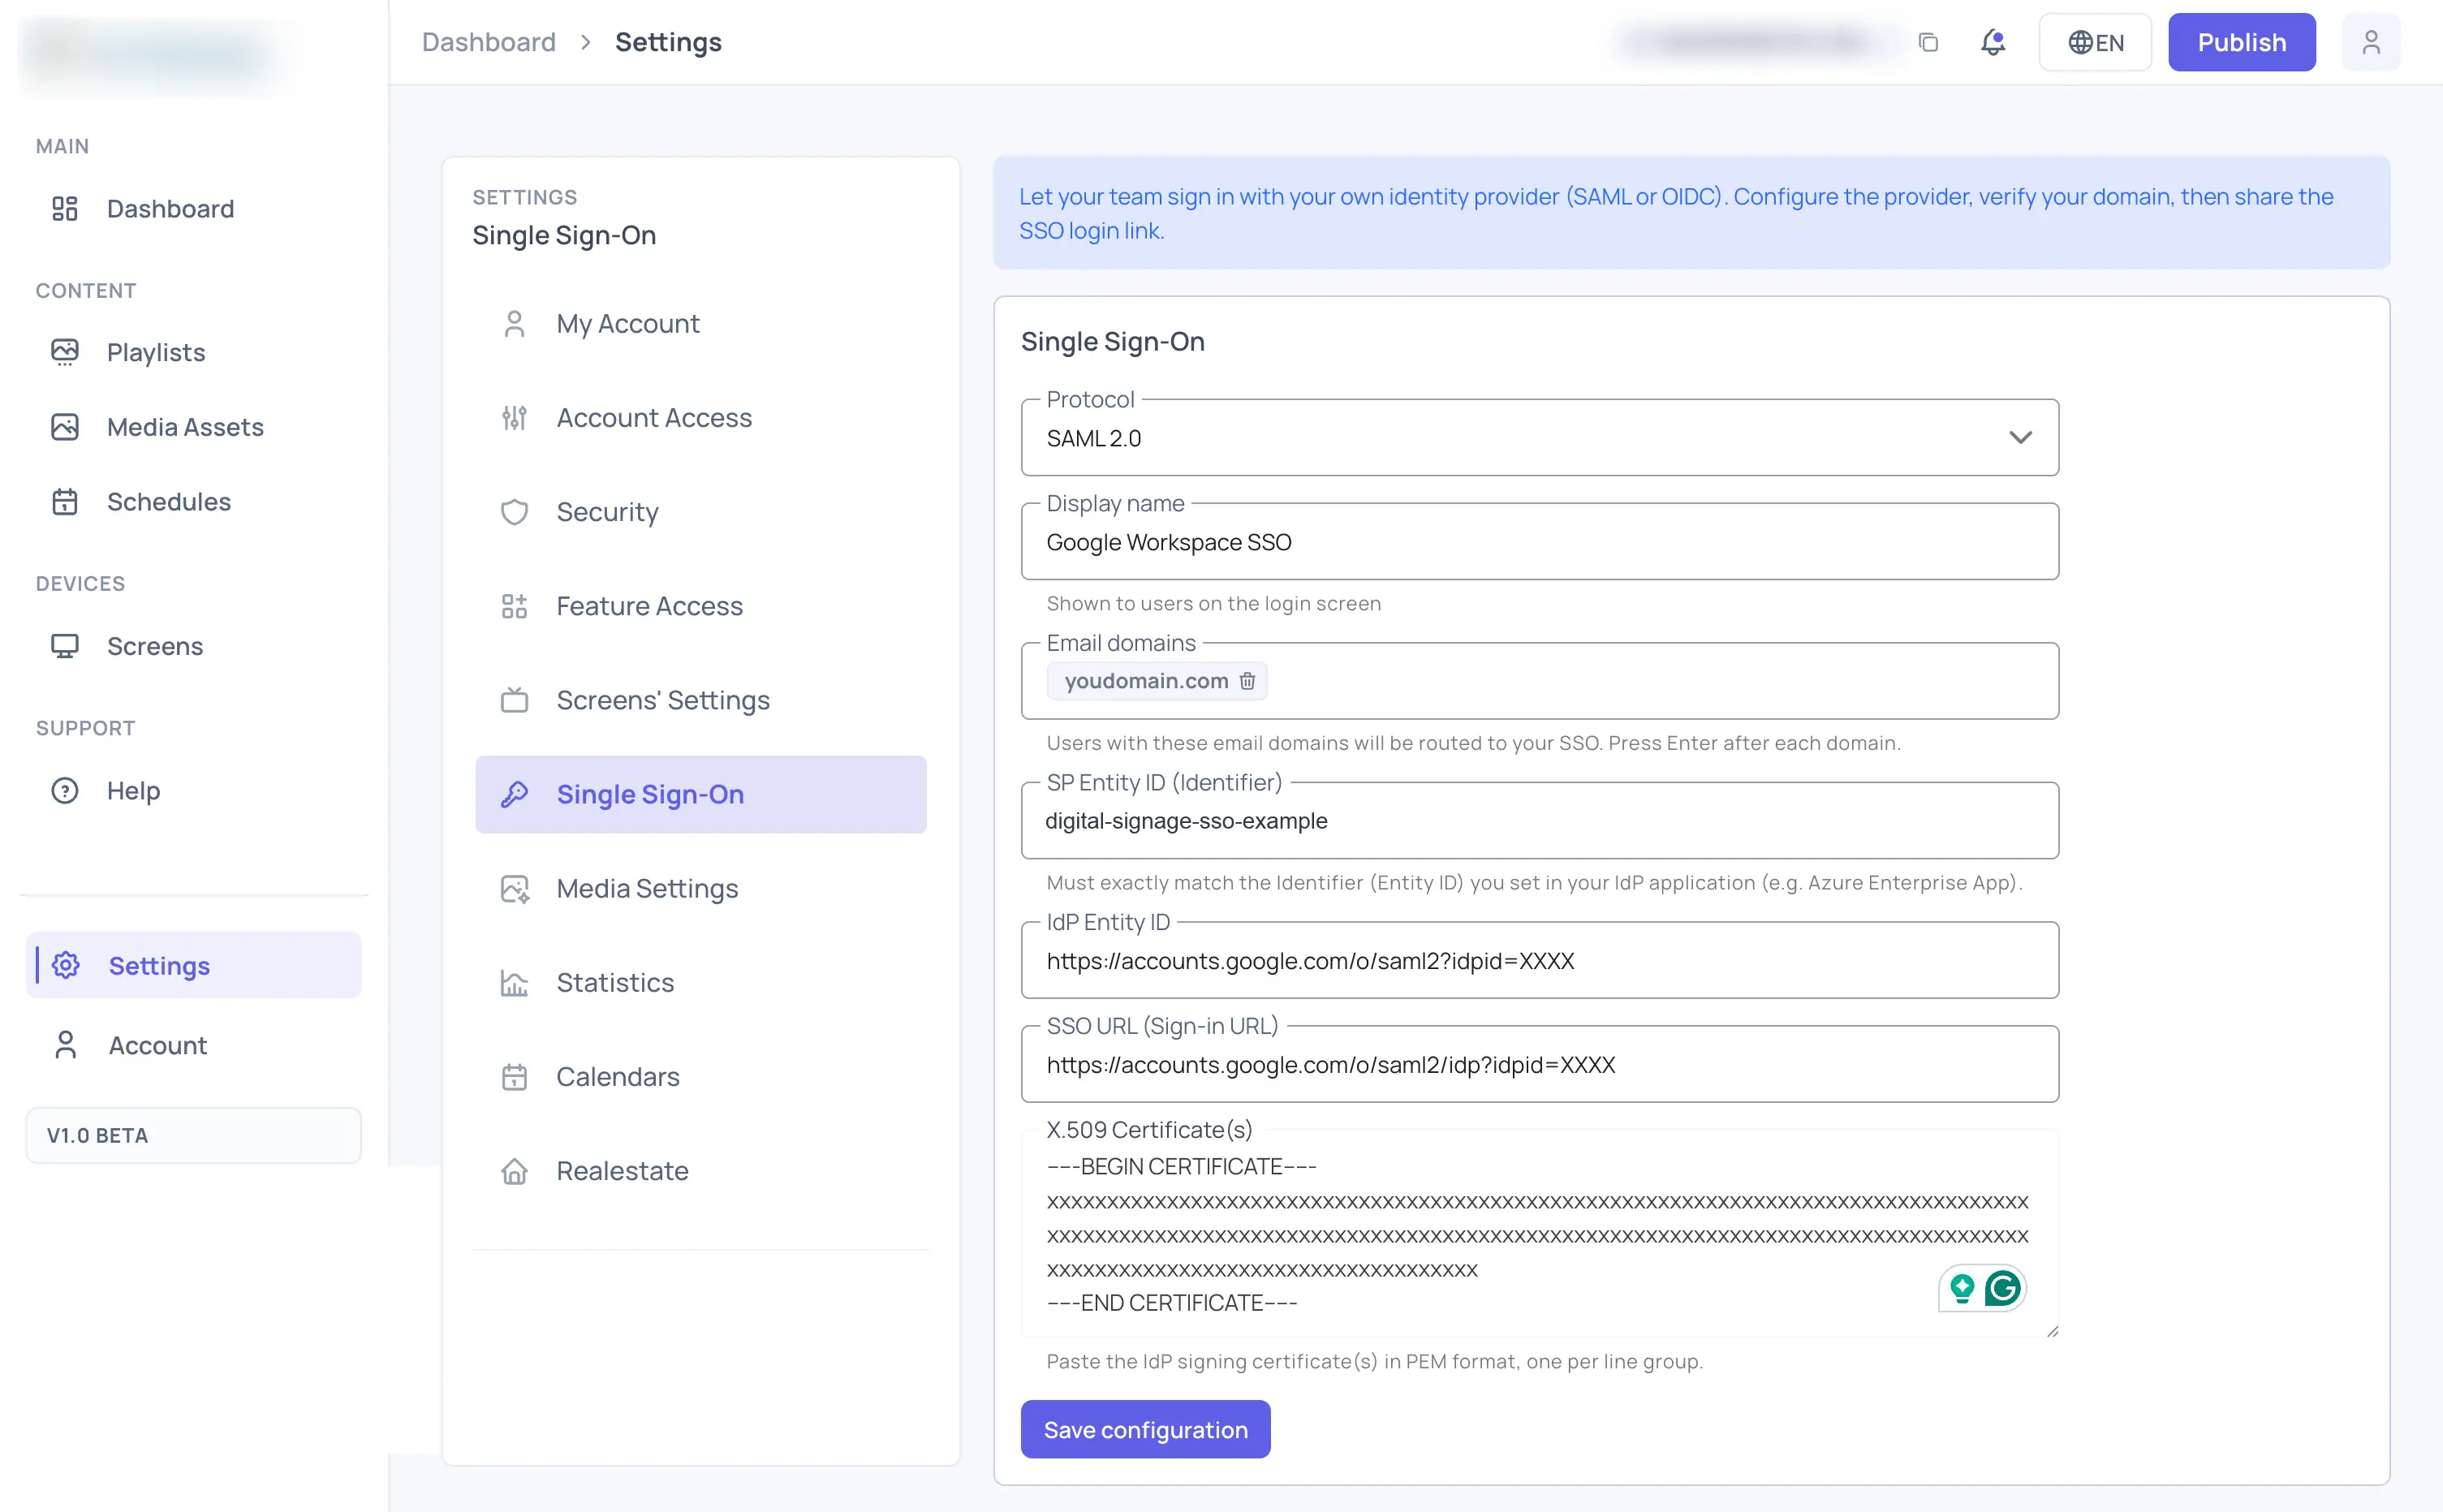
- Go to Settings.
- Open Single Sign-On.
- Select SAML 2.0 as the protocol.
- Enter a Display name, for example Google Workspace.
- Enter your organization email domain in Email domains, then press Enter. Example:
example.com(it may appear as@example.comafter saving). - Enter the SP Entity ID. This must exactly match the Entity ID configured in the Google Workspace service provider details. Use an ID-style value with no spaces, for example
digital-signage-sso-example.
Next, provide the Google Identity Provider details: the IdP Entity ID, SSO URL (Sign-in URL), and X.509 Certificate(s). You can fill these in two ways: upload the metadata file to populate them automatically, or paste each value manually.
Upload the metadata XML (recommended)
If you downloaded the metadata file in step 3 , you can upload it to fill the identity provider fields automatically instead of copying each value by hand.
- Click Upload metadata XML.
- Select the metadata file you downloaded from Google Workspace, for example
GoogleIDPMetadata.xml. - EasySignage reads the file and fills in the IdP Entity ID, SSO URL (Sign-in URL), and X.509 Certificate(s) fields for you.
- Review the values to confirm they are correct.
- Click Save configuration.
Uploading the file only fills in the fields. Your configuration is not saved until you click Save configuration, so you can review or adjust the values first.
Enter the details manually
If you copied the individual values in step 3 instead of downloading the metadata file, enter them by hand.
- Paste the Google Workspace Entity ID into IdP Entity ID.
- Paste the Google Workspace SSO URL into SSO URL (Sign-in URL).
- Paste the Google Workspace signing certificate, in PEM format, into X.509 Certificate(s). Include the full certificate, from
-----BEGIN CERTIFICATE-----to-----END CERTIFICATE-----. - Click Save configuration.
Verify Your Domain
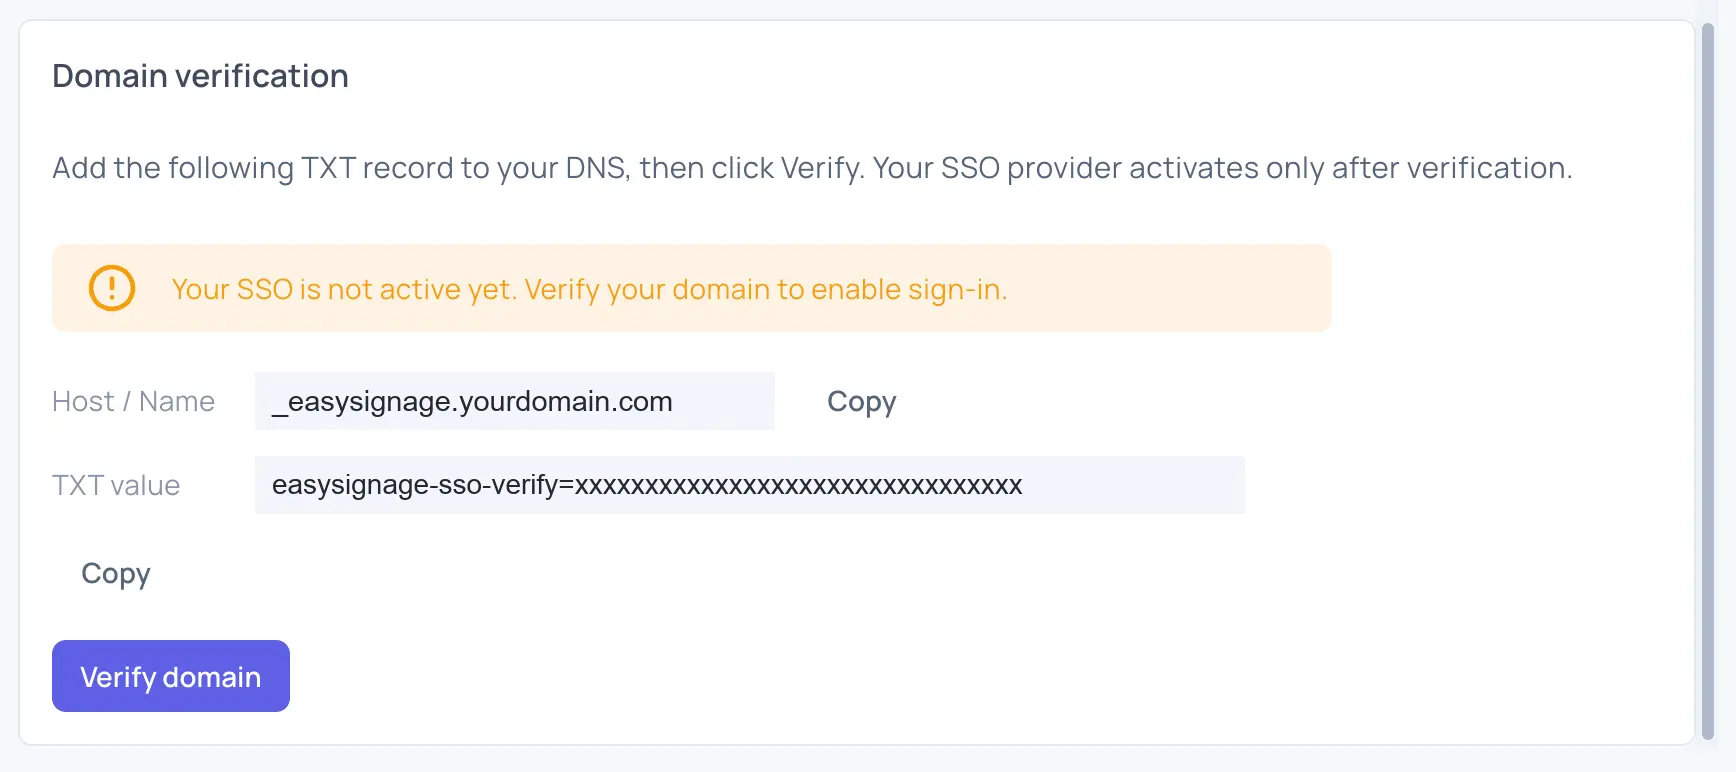
After saving the SSO configuration, EasySignage will show a Domain verification section. Your SSO provider is not active until the domain is verified.
- Copy the Host / Name value.
- Copy the TXT value.
- Open your DNS provider or domain host.
- Add a new TXT record using the values shown in EasySignage.
- Save the DNS record and wait for DNS propagation.
- Return to EasySignage and click Verify domain.
Example format:
| DNS field | Example value |
|---|---|
| Host / Name | _easysignage.yourdomain.com |
| TXT value | easysignage-sso-verify=xxxxxxxxxxxxxxxxxxxxxxxxxxxxxxxx |
After Domain Verification
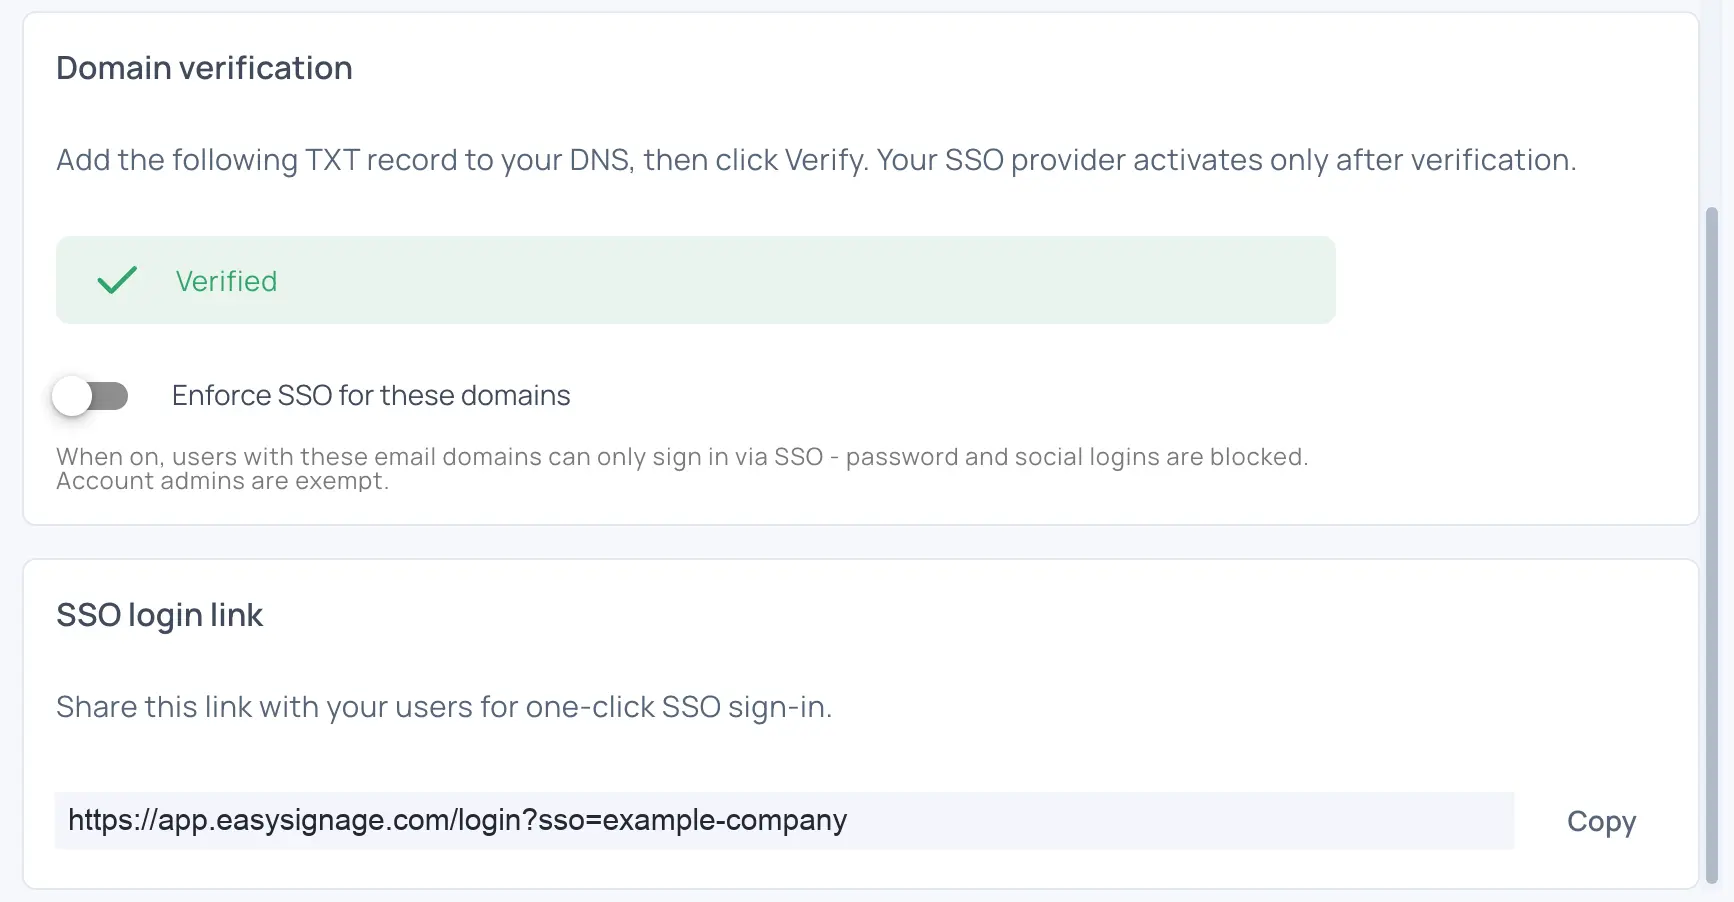
After your DNS TXT record is verified, EasySignage shows the domain as Verified and activates the SSO provider.
From this section, you can:
- Copy the SSO login link and share it with users for one-click SSO sign-in.
- Turn on Enforce SSO for these domains if users with the verified email domains should only sign in with SSO.
- Keep enforcement off if you still want users to sign in with password or social login.
When SSO enforcement is enabled, users with the verified email domains can only sign in through SSO. Password and social logins are blocked for those domains. Account admins are exempt.
Example SSO login link format:
https://app.easysignage.com/login?sso=example-company
Example Value Formats
Use the following examples only to validate the format of each field. Replace them with the real values from your Google Workspace SAML app.
| EasySignage field | Example format |
|---|---|
| Display name | Google Workspace SSO |
| Email domains | example.com |
| SP Entity ID (Identifier) | digital-signage-sso-example |
| IdP Entity ID | https://accounts.google.com/o/saml2?idpid=C012abcde |
| SSO URL (Sign-in URL) | https://accounts.google.com/o/saml2/idp?idpid=C012abcde |
| X.509 Certificate(s) | -----BEGIN CERTIFICATE----- ... -----END CERTIFICATE----- |
Test the SSO Login
- Go to the EasySignage login page.
- Click Log in with SSO.
- Enter an email address that uses the domain configured in Email domains.
- The user should be redirected to Google Workspace to sign in.
- After successful authentication, the user should return to EasySignage.
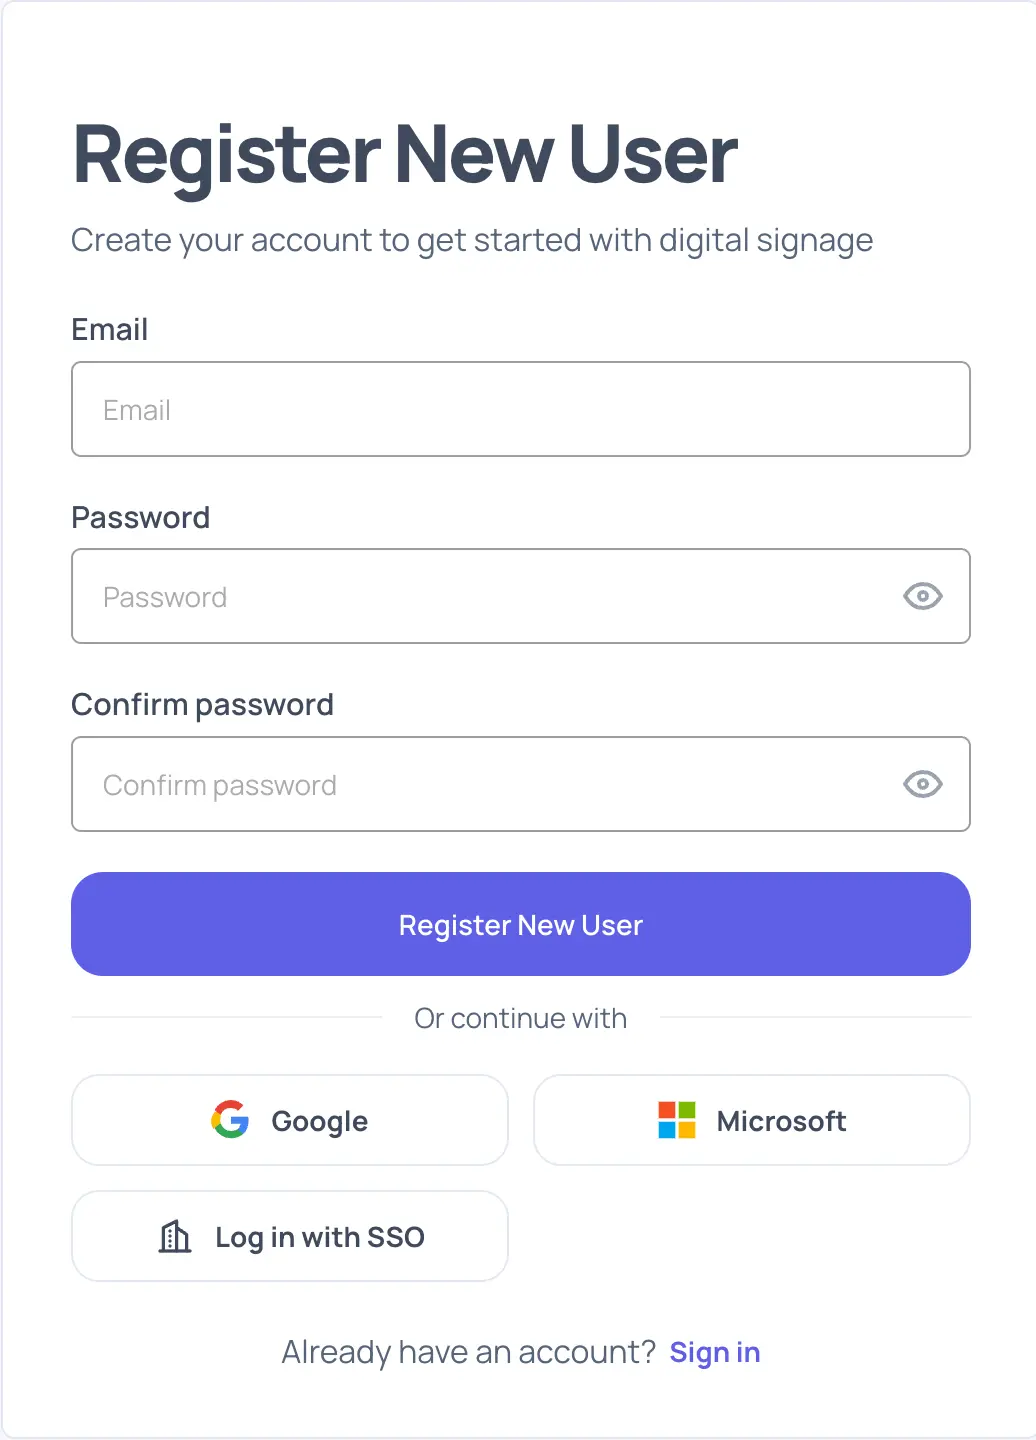
Users can also open the copied SSO login link directly to start the same SSO sign-in flow.
Use OpenID Connect (OIDC) instead
The setup above uses SAML 2.0, which is the recommended protocol for Google Workspace. If your identity provider supports OpenID Connect (OIDC), you can use that protocol with EasySignage instead.
- Go to Settings > Single Sign-On.
- Select OpenID Connect (OIDC) as the protocol.
- Enter a Display name and your organization Email domains.
- Enter the Issuer URL from your identity provider.
- Enter the Client ID and Client Secret from the application you registered with your identity provider.
- Click Save configuration.
Verify your domain the same way as the SAML setup. See Verify Your Domain .
Issuer URL auto-discovery
With OIDC you only need to provide the Issuer URL. EasySignage uses it to discover your provider’s endpoints automatically through the provider’s discovery document (/.well-known/openid-configuration), so you do not need to enter the authorization, token, or JWKS endpoints by hand.
You can paste the issuer in whatever form your provider gives you. When you click out of the field, EasySignage cleans it up automatically:
- It adds
https://if the address has no scheme. - It removes a trailing slash.
- It trims a full discovery link that ends in
/.well-known/openid-configurationdown to the issuer.
For example, if you paste the discovery link:
https://accounts.example.com/.well-known/openid-configuration
EasySignage stores the issuer as:
https://accounts.example.com
Review the cleaned-up value, then click Save configuration.
Troubleshooting
- Make sure the SP Entity ID in EasySignage exactly matches the Entity ID in Google Workspace.
- Make sure the SP Entity ID does not contain spaces. Use letters, numbers, hyphens, or underscores.
- Make sure the ACS URL is entered exactly as shown in this guide.
- Make sure the Google Workspace app is enabled for the user, group, or organizational unit.
- Make sure the user’s email domain is added in EasySignage and saved.
- If the certificate was copied manually, make sure the full PEM certificate is included.
- If uploading the metadata file does not fill the fields, make sure you selected the metadata XML downloaded from Google Workspace (for example
GoogleIDPMetadata.xml) and not another file. - After uploading the metadata file, remember to click Save configuration. The upload fills the fields but does not save the configuration on its own.
- For OIDC, make sure the Issuer URL is the base issuer, not the full discovery link. EasySignage trims a pasted discovery link automatically, but you can also enter the issuer directly.
- If the user cannot access EasySignage immediately, wait a few minutes and test again.