The LED Calibrate app shows a calibration grid for LED walls: one numbered, coloured cell for each cabinet or module, with 1-pixel lines on every cell edge, diagonal lines from corner to corner, and a centre cross and circle. A cabinet that is in the wrong place, turned, or a pixel out of line shows up as a wrong number, a repeated colour or a broken line.
The top-left corner shows the size of the app’s window in pixels. The app runs on the screen without an internet connection, in any layer size.
Note: The LED Calibrate app isn’t offered in video wall playlists.
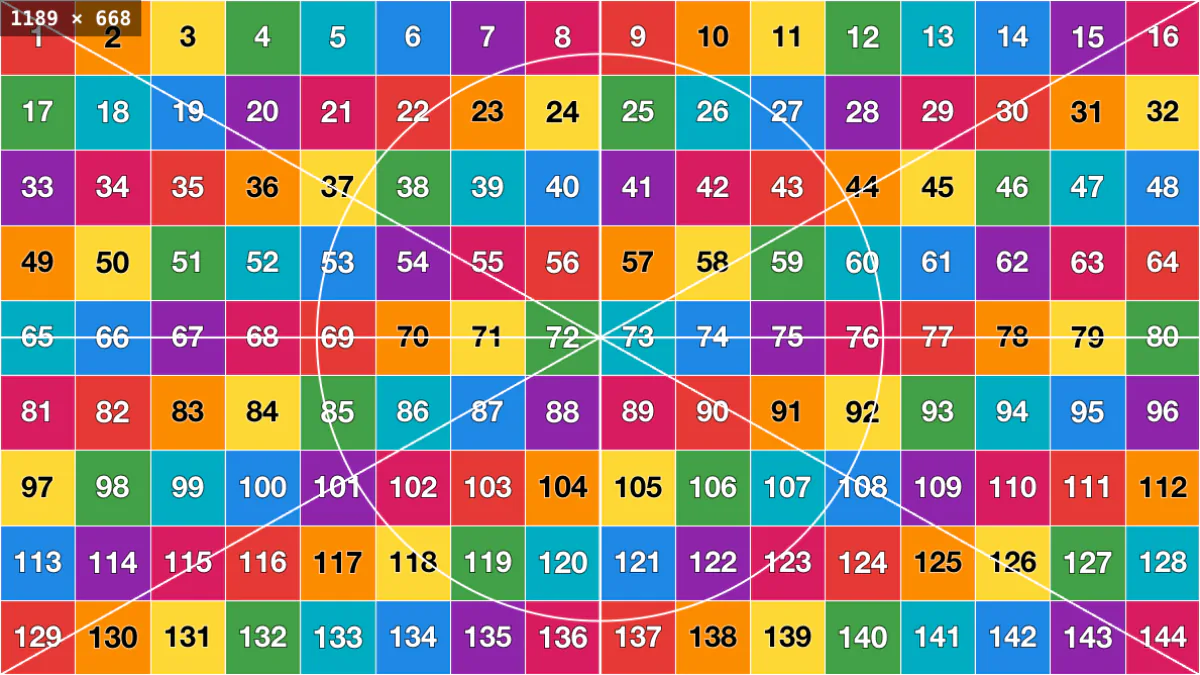
When to use it
- Mapping cabinets: after you set up the LED controller, check that each cabinet shows the right number in the right place. A swapped cabinet shows a number out of order and a colour that matches its neighbour.
- Checking the cabling: choose 1, 2, 3 snaking like the cable to number the cells in the order a daisy-chained cable usually runs.
- Finding seams and gaps: the 1-pixel lines on the cell edges show a cabinet that is a pixel out of line, and the diagonals show a step where cabinets don’t meet.
- Checking brightness and colour after a repair: choose Grey (brightness uniformity) to spot a replaced module that is brighter, darker or a different tint than its neighbours.
- Testing each colour: choose Red, green, blue and white to find a cabinet with a weak colour.
- Checking scaling: compare the window size in the corner with the wall’s resolution, and check that the centre circle is round.
Add the LED Calibrate app
- Open the playlist, then click the layer. See Playlist Media Management.
- If the layer is empty, the content apps open. If it already has media, click Add New.
- Click Screen tools, then LED Calibrate. You can also type its name in Search Apps.
- On the Grid page, set Columns and Rows to the number of cabinets or modules across and down the wall. Click Next.
- On the Look page, choose Cell colours, Cell numbers and the lines to show. See Settings.
- Click Save.
- Click Publish changes of this playlist to send it to your screens.
The settings pages work like other apps with setup pages. See App Setup Pages. To change the settings later, click Edit next to the item in the layer.
Settings
Grid
- Columns: how many cells across, from 1 to 48. The default is 16.
- Rows: how many cells down, from 1 to 27. The default is 9.
The app splits the layer evenly between the cells. When the layer doesn’t divide evenly, cells differ by at most one pixel.
Look
- Cell colours:
- Distinct colours (find swapped cabinets): no cell has the same colour as the cell beside, below or diagonal to it.
- Red, green, blue and white: each cell shows one colour.
- Grey (brightness uniformity): every cell is the same grey.
- Black and white checker: alternating black and white cells, with red lines.
- Cell numbers:
- 1, 2, 3 row by row: numbered left to right, top to bottom.
- 1, 2, 3 snaking like the cable: every other row is numbered right to left.
- A1, A2 (row letter, column): a letter for the row and a number for the column.
- 1.1, 1.2 (row.column): the row and the column.
- 1-pixel lines on the cell edges: a line exactly one pixel wide on every cell edge and around the outside.
- Diagonal lines corner to corner: two lines across the whole wall.
- Centre cross and circle: a cross through the centre and a circle that must look round.
Each cell also shows its row and column, such as R2 C5, in its bottom-left corner when the cell is large enough.
Note: The grid fills the layer to the very edge, and nothing moves. Remove the app from the playlist when you finish calibrating, so a still image doesn’t stay on the wall for hours.