EasySignage gives you two powerful ways to protect your account:
Single Sign-On (SSO): let your team sign in through your organization’s own identity provider (Microsoft Entra/Azure AD, Okta, OneLogin, Google Workspace, and others).
Two-Factor Authentication (2FA): protect any account with a 6-digit code from an authenticator app.
For more information on how to set the Two-Factor Authentication (2FA), please refer to the following page: Two-Factor Authentication (2FA) .
Both are self-service: you can set them up from your dashboard in minutes, without contacting support.
How to Setup Single Sign-On (SSO)
With SSO, your users sign in to EasySignage with their company credentials instead of a separate password. You stay in control: accounts are managed in your identity provider, and you can require that everyone on your email domain uses SSO.
What you need before you start
- The account owner’s sign-in: only the owner of the EasySignage account can set up SSO for it.
- Admin access to your identity provider (e.g. Microsoft Entra/Azure AD, Okta, OneLogin) to create an application and copy its details.
- Access to your domain’s DNS settings (e.g. Cloudflare, GoDaddy, Route 53), you’ll add one TXT record to prove you own your email domain.
SSO depends on your plan. If it isn’t included in your plan, the page shows a warning at the top and the fields can’t be changed.
Step 1: Open the SSO settings
- Sign in to EasySignage as the account owner.
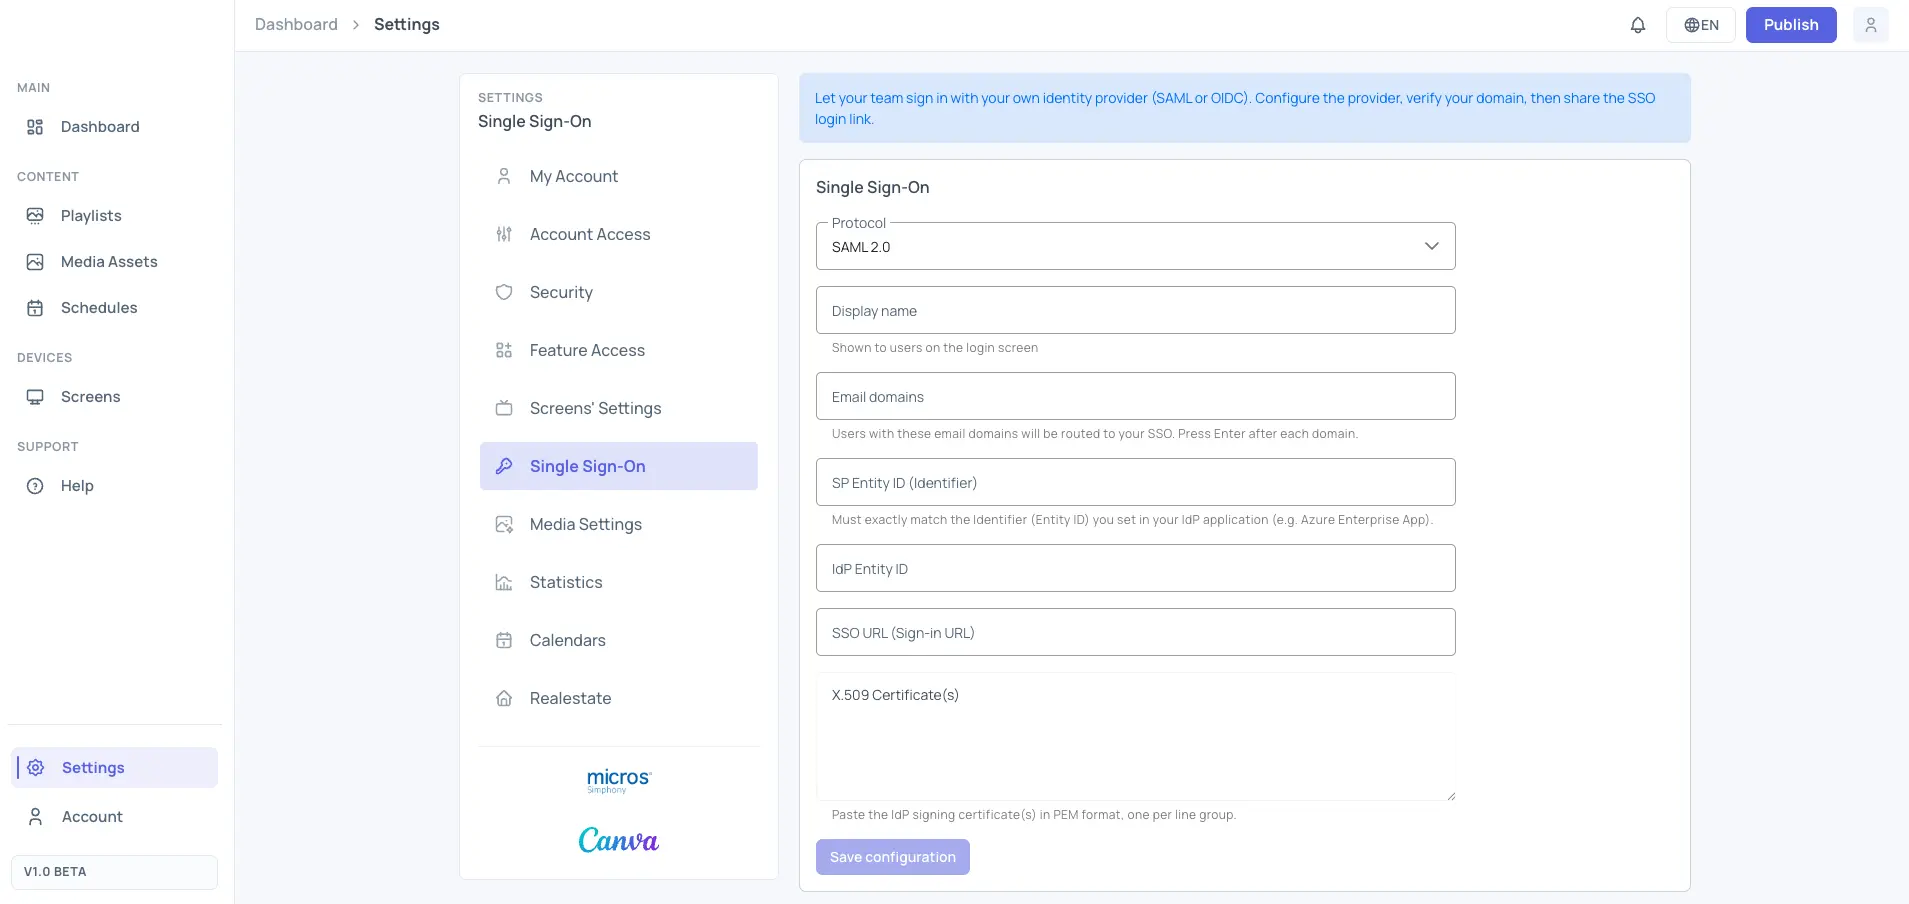
- Go to Settings → Single Sign-On.
Step 2: Create an application in your identity provider
In your identity provider, create a new SAML 2.0 application (recommended) or an OpenID Connect (OIDC) application, and note the details EasySignage asks for:
- SAML: the IdP Entity ID, the sign-in (SSO) URL and the signing certificate. Most providers also let you download all three in one metadata XML file.
- OIDC: the Issuer URL, the Client ID and the Client Secret.
For SAML, also choose an Identifier (Entity ID) for the application (e.g. mycompany-easysignage). You will enter the same value in EasySignage as the SP Entity ID.
Important: The Identifier (Entity ID) must be exactly the same in both systems. A mismatch is the most common cause of sign-in errors.
Also make sure your identity provider sends the user’s email address in the sign-in response (for Azure, the default emailaddress → user.mail claim works; if some accounts have no mail value, map it to user.userprincipalname instead).
The identity provider will also ask for a Reply URL. EasySignage shows it after you save the configuration in Step 3, so you can leave it for now and add it in Step 4.
Step 3: Enter your identity provider details in EasySignage
On the Settings → Single Sign-On page:
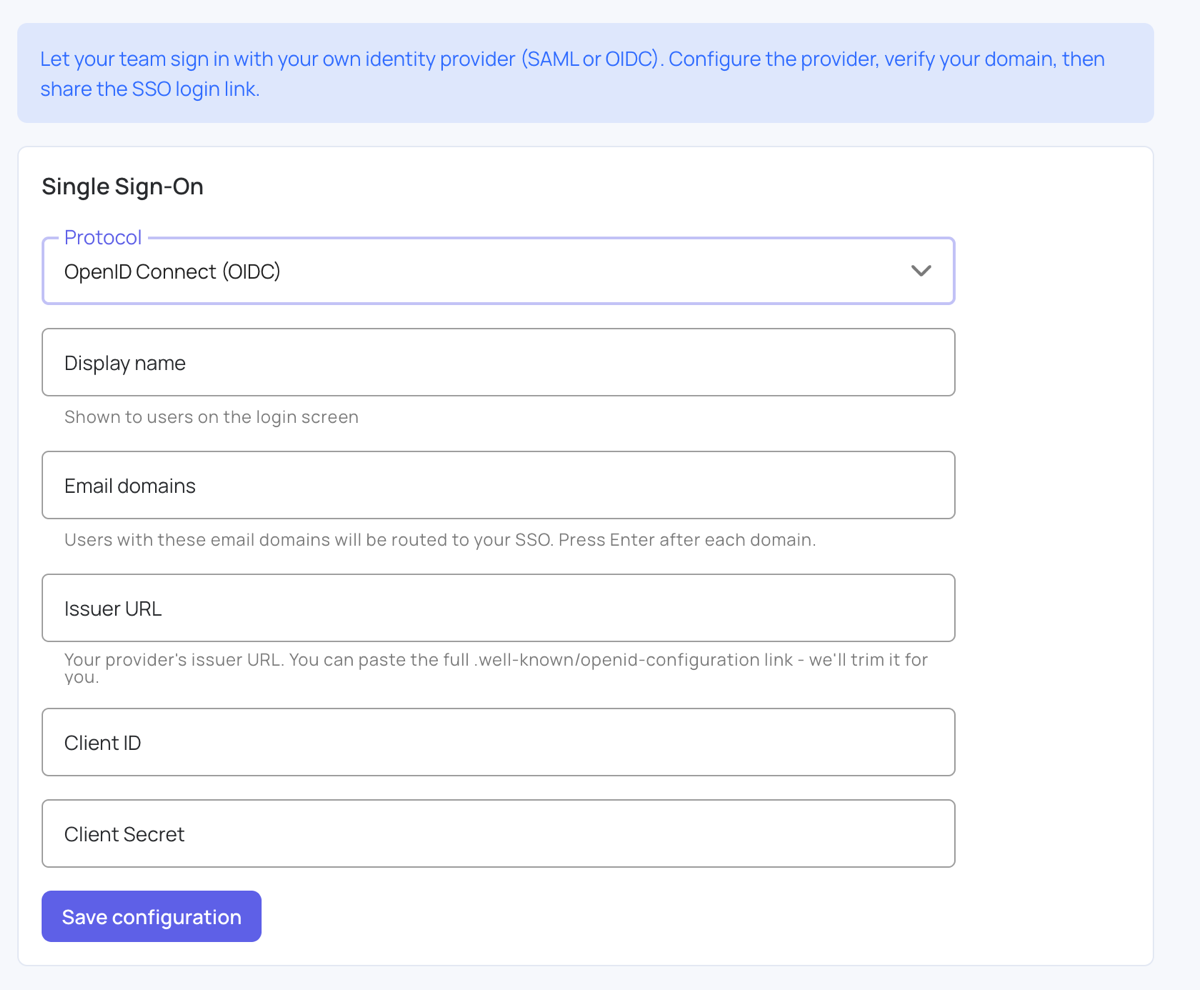
- Choose the Protocol: SAML 2.0 or OpenID Connect (OIDC).
- Enter a Display name (shown to your users on the login screen, e.g. “Acme Corp SSO”).
- Add your Email domains, users with these email domains will be routed to your SSO (e.g.
acme.com). Press Enter (or type a comma) after each domain. - Fill in the protocol fields:
- SAML: click Upload metadata XML and choose the metadata file from your identity provider to fill in the IdP Entity ID, SSO URL and certificate for you, then check them. Or enter them by hand: IdP Entity ID, SSO URL (Sign-in URL) and the signing X.509 Certificate(s) (paste in PEM format). Then enter the SP Entity ID (Identifier) you chose in Step 2.
- OIDC: Issuer URL, Client ID and Client Secret. You can paste the full
.well-known/openid-configurationlink as the Issuer URL; it is trimmed for you.
- Click Save configuration.
Step 4: Add the Reply URL to your identity provider
For SAML, after you save, the page shows a Reply URL (ACS) with a Copy button. Copy it and paste it into your identity provider application as the Reply URL (also called Assertion Consumer Service URL or ACS URL).
The page does not show a redirect URL for OIDC. If your identity provider asks for one, contact our support team.
Step 5: Verify your domain
To protect your organization, SSO does not activate until you prove you own the email domain:
- After saving, the Domain verification panel shows a TXT record (a Host / Name and a TXT value, each with a Copy button).
- Add this TXT record in your DNS provider. If you added more than one email domain, add the same TXT value to each of them: the host is
_easysignage.followed by that domain. - Back in EasySignage, click Verify domain.
- When verification succeeds you’ll see a green Verified message, and your SSO becomes active.
DNS changes can take a few minutes to propagate. If verification fails right after you add the record, wait 5–10 minutes and try again. Don’t worry if your DNS provider displays the value wrapped in quotes, that’s normal.
An email domain can be used by only one EasySignage account. If another account already uses one of your domains for SSO, verification stops with a message saying so.
Step 6: Sign in with SSO
Once verified, your users have three ways in:
SSO login link: the SSO login link panel on the settings page shows a link to share (e.g.
https://…/sso?sso=…). Bookmark it or add it to your intranet; it takes users straight to your company sign-in.“Log in with SSO” button: on the login page, click it, enter your work email, click Continue, and you’ll be redirected to your company sign-in page.
Automatic detection: if a user types their work email into the normal sign-in form, EasySignage detects the SSO domain and routes them to your company sign-in automatically.
Enforcing SSO (blocking passwords and social logins)
After your domain is verified, an “Enforce SSO for these domains” switch appears in the Domain verification panel.
When enabled:
- Users on your email domains can only sign in through your SSO.
- Password, Google, Microsoft and email-link sign-ins are blocked for them, anyone trying sees: “Your organization requires single sign-on. Please sign in with your company’s SSO instead of a password or social login.”
- This includes you, if your own email is on one of these domains. Sign in once with your SSO to check it works before you switch enforcement on.
The switch saves immediately, no separate save step.
Updating or removing SSO
- Editing details (display name, certificate renewal, URLs): edit the fields and click Save configuration. Your SSO stays active.
- Changing the email domains or the protocol: SSO sign-in stops until you verify the domains again (Step 5).
- Removing SSO: click Delete SSO and confirm. SSO sign-in stops immediately and your users can sign in with other methods again (unless you re-create the configuration later).
Helpful Links
Frequently Asked Questions
Q: Which identity providers are supported?
A: Any provider that supports SAML 2.0 or OpenID Connect, including Microsoft Entra ID (Azure AD), Okta, OneLogin, Ping Identity, Google Workspace, JumpCloud, and Auth0.
Q: Should I choose SAML or OIDC?
A: If your identity provider offers both, SAML 2.0 is the most common choice for enterprise SSO and is what most IT teams set up first. OIDC works equally well. For OIDC, make sure the Issuer URL is your tenant-specific URL (for Azure: https://login.microsoftonline.com/<your-tenant-id>/v2.0, not a generic address).
Q: I get “AADSTS700016: Application … was not found in the directory” (Azure)
A: The SP Entity ID in EasySignage doesn’t match the Identifier (Entity ID) in your Azure Enterprise Application. Open both screens and make the values identical, character for character.
Q: Domain verification keeps saying the TXT record was not found
- Confirm the record Host / Name matches what EasySignage shows (it starts with
_easysignage.). - Confirm the value matches exactly.
- If you added more than one email domain, confirm every domain has the record.
- Wait 5–10 minutes for DNS propagation, then click Verify again.
- If your provider auto-appends your domain to the host name, enter only the
_easysignagepart.
Q: Do my users need to register first?
A: No. The first time a user signs in through your SSO, their EasySignage user is created automatically, added to your account’s users, and opens your account (just-in-time provisioning).
Q: Can I use more than one email domain?
A: Yes, add each domain in the Email domains field. Every domain must pass DNS verification.
Q: We have multiple EasySignage accounts. Does SSO on one affect the others?
A: No. SSO configuration, domain verification, and enforcement apply only to the account where you configured them. Each email domain can be set up for SSO on one account only.
Q: What happens to users who already sign in with a password or Google?
A: They keep working until you switch on Enforce SSO. After that, they’re asked to use your company sign-in instead. Their content and settings are unaffected.
Q: I enabled Enforce SSO and a user is locked out. What do I do?
A: They aren’t locked out of EasySignage, only out of non-SSO sign-in methods. Ask them to use the SSO login link or the “Log in with SSO” button. If your identity provider is the problem (e.g. the user isn’t assigned to the application), assign them there. If you can’t sign in yourself, contact our support team.
Q: Our identity provider certificate is expiring. Will SSO break?
A: When you rotate the certificate in your identity provider, paste the new certificate into Settings → Single Sign-On and click Save configuration. Do this before the old certificate expires to avoid sign-in interruptions. Your domain stays verified, no DNS changes needed.
Q: Is the SSO login link secret?
A: No, treat it as a convenience, not a credential. It only points users to your company sign-in page; your identity provider still controls who can actually authenticate.
Security Best Practices
- Verify your domain and enable Enforce SSO so no one on your domain can bypass your identity provider.
- Enable 2FA for any account that still signs in with a password, especially admin accounts.
- Review Settings → Security for additional protections: IP address restrictions, country restrictions, and email-domain restrictions.
- Rotate identity provider certificates before they expire and keep your authenticator app backed up.
Need help? Contact our support team.