The Screen Settings section allows you to configure important behavior and control features for each screen. From this section, you can manage security settings, set automatic restarts, synchronize screens, adjust screens brightness, control media download behavior, and oversee status reporting.
How to configure the screen settings
To access the Screen Settings:
- Click on the profile icon in the top right corner.
- From the drop-down menu list, select Settings.
- Navigate to Screen Settings.
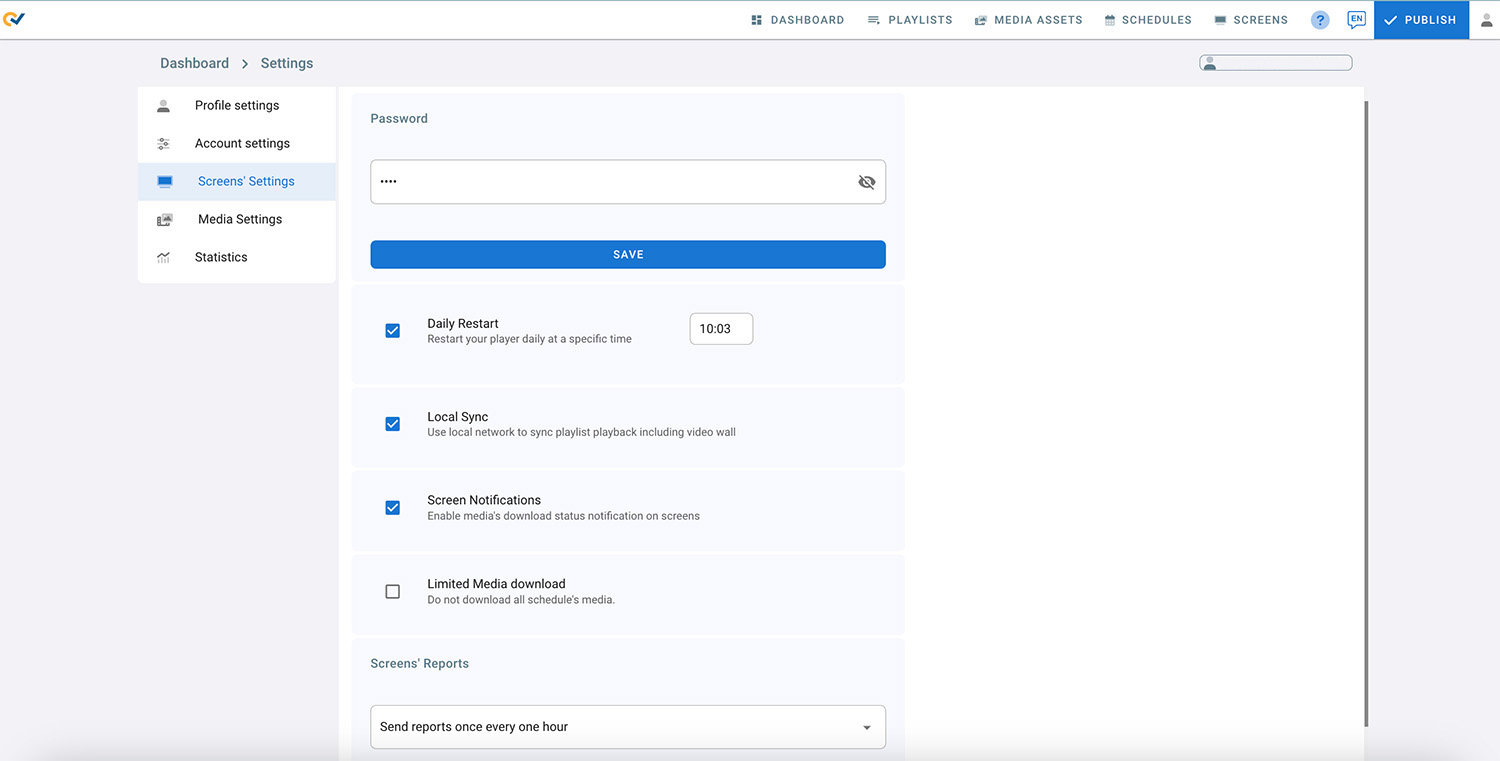
1. Password
- This password is used to open the settings page on the screen
- Click on the eye to view the current password
- To change the passowrd, type in the new passowrd and click on Save
- Click on Publish
2. Brightness Management
In this section you can manage the default brightness settings for all connected screens added to the account. Any change in the brightness settings will apply to all screens.
To access the brightness settings:
- Click the profile icon in the top right corner.
- Select “Settings”.
- Go to “Screens’ Settings”.
- In the Brightness Management section, click on SETTINGS.
1. Manual Operation:
- To manually adjust brightness for all connected screens, use the brightness slider to move left and right. The maximum brightness is 100, for full nrightness, and the minimum is 1, for the lowest brightness.
- After making your adjustments, click on “APPLY TO ALL SCREENS” to apply the brightness settings to all displays.
- Click save to keep your changes, and then click on PUBLISH.
2. Schedule Operation:
To schedule automatic brightness adjustments across all connected screens:
- Check the box labelled “Schedule”.
- Select the day you want to set the schedule for, such as Tuesday. You can create schedules for each day of the week.
- Click on “Schedule”.
- Edit the start and end times for the schedule.
- Set the desired brightness level for the scheduled times.
- To add another schedule, click on “ADD SCHEDULE”. You can add up to 3 schedules for each day.
- Once you finish editing, click “APPLY TO ALL SCREENS” to apply the brightness settings to all displays.
- Click “Save” to keep your changes, then click on PUBLISH.
Note:
- Ensure your screen is set to the correct timezone for the schedule to function properly.
- The schedule will continue to run seamlessly on all screens, even if they go offline during network failures, and this is due to local caching on the devices.
3. Daily Restart
- Check the Daily Restart check box to enable this feature
- Enter the 24 hour format time you want the screen to restart at
- Click on Publish
- The screen will restart based on the screen time
4. Local Sync
Local Sync means that the screens use local network to sync playlist playback including video wall screens.
Note that your screens should be on the same local network for this feature to work properly.
- Check the Local Sync check box to enable this feature
5. Screen Notifications
- Check the Screen Notifications check box to enable this feature
- Click on Publish
- You will start seeing notifications in the bottom corner of your screen about media download status, network connectivity and other notifications
6. Limited Media download
- This feature is used with schedules in case the user doesn’t want all the media to be downloaded to the screen all at once (for example: large files and multiple playlists)
- It is used to limit the schedule download to only the default playlists and the playlists scheduled for the current and next day
- The downloads will update every day, old media will be removed and new ones will replace them
7. Screen’s Report
Reports about the screen’s online/offline status
Do not send reports: no reports will be sent to the user’s email
Send reports immediately: Send a report everytime a screen changes its status (Online/Offline)
Send reports once every one hour: Screens’ status activity in the past hour will be aggregated and sent to the user’s email
Send reports once a day: Screens’ status activity in the past day will be aggregated and sent to the user’s email