Use Locations to organise digital signage screens by site. A location is one site, such as a store or an office. A region groups locations, for example Australia > NSW > Sydney North. With locations you can:
- put each screen in its location and filter screens by location or region
- limit a team to the locations and regions it works at, so it only sees those screens
- set power and brightness for every screen at a location in one go
Note: Locations is included on the Enterprise plan. It stays off until a member of the Administrators team turns it on. Only Administrators can add, edit, import and archive locations and regions.
Turn on Locations
- Go to Settings > Locations.
- Turn on the switch so it reads Locations is on.
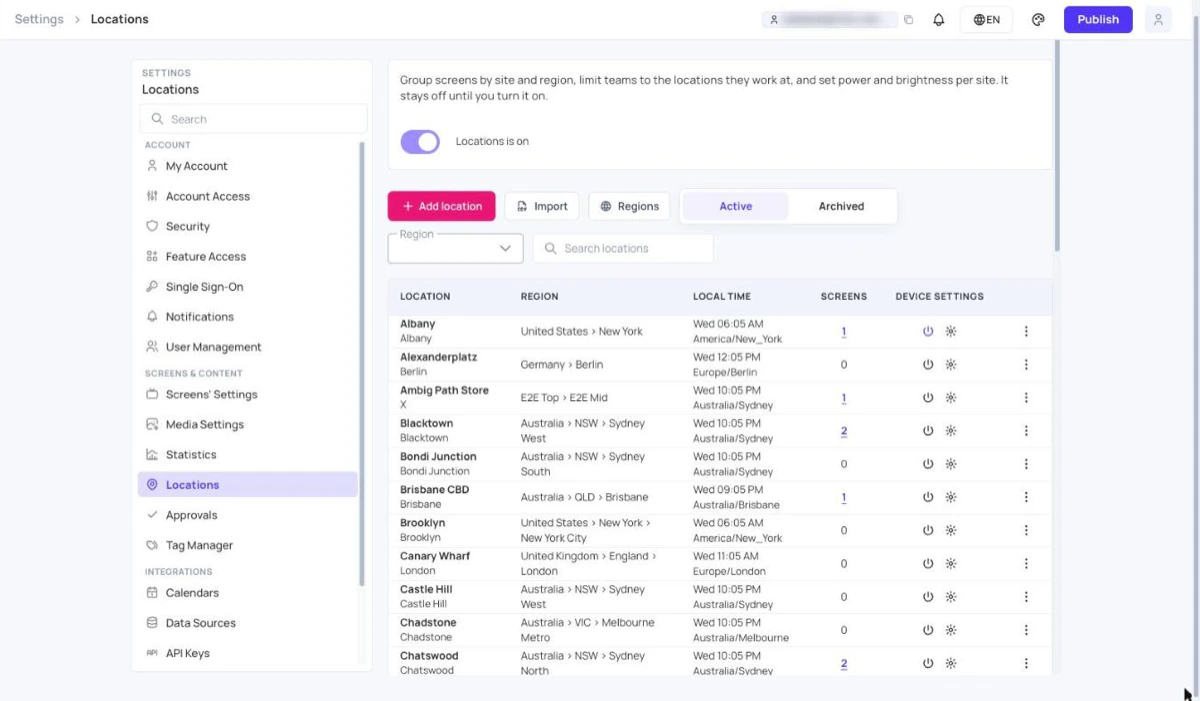
You can’t turn Locations off while teams are limited to locations. First set those teams to All locations. See Limit a team to its locations.
The locations table
Each row shows:
- Location: the name, with the city or time zone under it.
- Region: the full region path, or “—” when the location has no region.
- Local time: the current time at the location, and its time zone.
- Screens: how many screens are at the location. Click the number to list them. A clock icon means some of these screens report a different time zone from the location’s.
- Device settings: power and brightness icons. A highlighted icon means the setting is set for the whole location.
Use the toolbar to find locations:
- Active and Archived: switch between current and archived locations.
- Region: show only locations in a region and the regions inside it.
- Search locations: search by name, city, street address or external ID.
Add a location
- Click Add location.
- Enter the Location name.
- Check the Timezone. It starts with your computer’s time zone. Schedules and rules use the location’s time zone.
- Optional: choose a Region. If other locations in that region use a different time zone, a message suggests it. Click Use it to apply it.
- Optional: fill in the Address fields and External IDs. An external ID is how another system, such as a BI tool, names this site. Each ID can belong to one location only.
- Click Save.
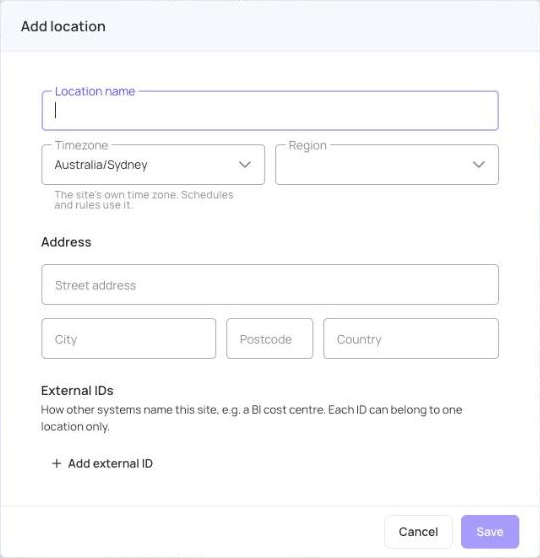
To change a location, click the menu at the end of its row, then Edit.
Set up regions
Regions group locations, so a regional team can work at all of them. Regions can sit inside other regions, up to 8 levels deep.
- Click Regions.
- Type the name in New region.
- In Inside, choose Top level or the region it belongs to.
- Click Add.
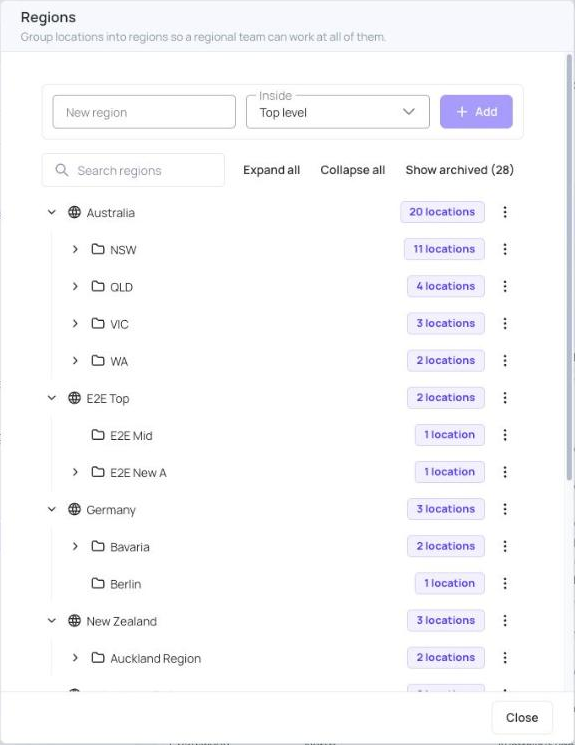
In the Regions window:
- Click the arrow next to a region to fold or unfold it, or use Expand all and Collapse all.
- The chip next to each region shows how many locations it holds, including the regions inside it. Click the chip to show those locations in the table.
- Use the menu next to a region to Add region inside, Rename, Move into another region, see its Teams, or Archive it.
- Two regions at the same level can’t have the same name.
A region that still holds locations, or regions with locations, can’t be archived. Move or archive those first.
Import locations from a CSV file
To add many locations at once:
- Click Import.
- Optional: click Download a sample CSV to get a file with the right columns.
- Click Choose a CSV file and pick your file.
- Check the summary, then click Import.
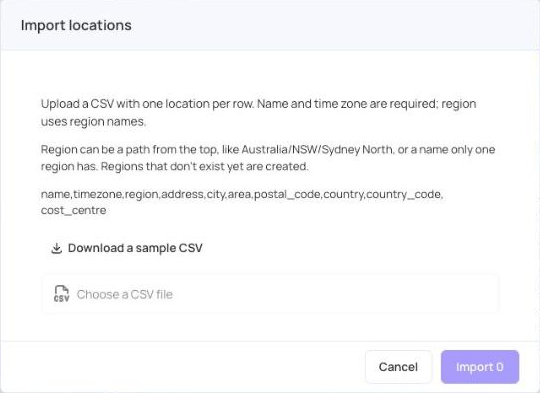
The file has one location per row and these columns:
name,timezone,region,address,city,area,postal_code,country,country_code,cost_centre
- Only
nameandtimezoneare required. Use a time zone name such asAustralia/Sydney. regioncan be a path from the top, such asAustralia/NSW/Sydney North, or a name that only one region has.- Regions that don’t exist yet are created for you. The import button then reads Create … regions and import.
- Locations that already exist are listed, and Skip them is ticked so they aren’t added twice. The import only adds locations; it never changes existing ones.
- If some rows have problems, they are listed by line number. You can fix the file, or tick the option to skip those rows and import the others.
Put screens in a location
From Settings > Locations:
- Click the menu at the end of the location’s row, then Add screens.
- Tick the screens. Use Unassigned only to show screens that have no location yet.
- Click Move … screens. Screens that were at another location move to this one.
From Screens:
- Click the location shown for the screen in the Screen Location column, or tick several screens and click Location.
- In Set Location, choose the location, or No location.
- Click Save.
On the Screens page, use the Location filter to show the screens at a location or in a region.
Set power and brightness for a location
- In the Device settings column, click the power or brightness icon for the location.
- Choose the settings and save. They apply to every screen at the location.
A screen that already has its own settings keeps them. On that screen’s own power or brightness window, click Use location settings to switch it to the location’s settings. See Power Management and Brightness Management.
Limit a team to its locations
When Locations is on, each team page has a Locations tab. Choose Selected locations and pick the locations and regions the team works at. The team then only sees screens at those places. See Teams.
You can also start from a location: click the menu at the end of its row, then Teams. Turn a team on to add this location to its Works at, then click Save.
Archive or restore a location
Locations and regions can’t be deleted, only archived.
- To archive a location, click the menu at the end of its row, then Archive. Click Undo in the message if you change your mind.
- To restore it, click Archived, then the menu at the end of its row, then Restore.