EasySignage Setup Guide for Windows Digital Signage
Digital signage is a versatile tool for communication, marketing, and engagement in various settings. It comes in all shapes and sizes, captivating the attention of audiences and conveying messages effectively.
Managing digital signage is easy and straightforward. With a single click, you can update the content on any display, regardless of the number of displays you have. All you need is the proper hardware, software , and content to make it work seamlessly.
We’ll explore the world of digital signage through the lens of EasySignage, focusing specifically on its seamless setup and customisation for Windows-based devices.
What is Windows-based Digital Signage?
It’s a cutting-edge solution that allows you to create, manage, and display captivating content on digital signage screens that run a Microsoft Windows-based operating system. These screens can be strategically placed in any physical space to deliver targeted messages, advertisements, information, or entertainment. They are commonly used in various settings, including retail stores , offices, educational institutions , healthcare facilities, and public venues.
Getting Started: System Requirements
1. Define Your Goals
First, you need to define your goals for your digital signage. It’s important to figure out what you want to accomplish with it, such as increasing sales , improving communication, or enhancing branding. By having clear objectives, you’ll be able to guide your strategy and achieve your desired outcomes.
2. Choose Your Hardware
Select the right hardware components, such as screens, players , and mounts, based on your space requirements and budget.
Before installing EasySignage on your Windows device, it is important to ensure that your system meets the necessary requirements. Are you running Windows 7, 8, 10 or 11? You’ll need a compatible operating system. Do you have sufficient RAM and disk space?
You need to address these fundamental questions before starting the installation process.
EasySignage aims to simplify the installation process, but ensuring your system meets the prerequisites is crucial for a seamless experience.
How to Install EasySignage on Windows Devices
Getting started with Windows Digital Signage is easier than you think! Here’s a step-by-step guide to help you with the installation process:
Pre-installation steps:
Before installing the EasySignage app on a Windows player, it is important to follow these steps:
Log in to the Windows device.
Disable the screen saver.
Power Options: Under the Control Panel, in the power options section, make sure to set the PC to never dim the display, never turn off the display and never put the computer in sleep mode.
Clean Apps: Uninstall all unneeded programs to prevent interference with the EasySignage app.
Disable Auto Update of Installed Apps (printer apps, Adobe Acrobat) to avoid interruptions while the digital signage is playing.
Make sure you have the latest Edge, Chrome or Chromium Browser installed.
Install EasySignage App:
Step 1: Download the EasySignage Installer
Download the EasySignage App for Microsoft Windows from the following links:
For 64-bit Windows:
CLICK TO DOWNLOAD FOR 64-BITFor 32-bit Windows:
CLICK TO DOWNLOAD FOR 32-BIT
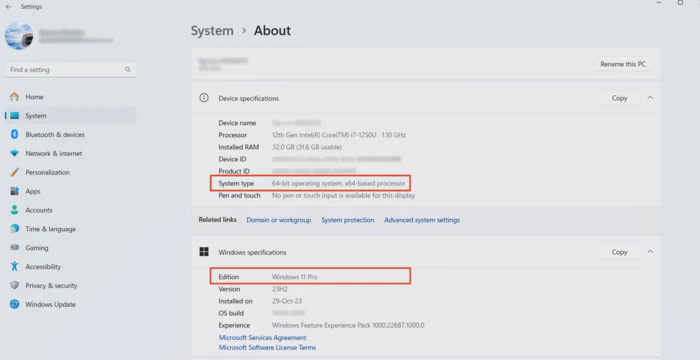
To find if your Windows operating system is 32 or 64-bit:
- Select the Start button → Settings → System → About
- Open the About settings.
- Under Device specifications → System Type → check if you’re running a 32-bit or 64-bit version of Windows.
- Under Windows specifications, check which edition and version of Windows your device is running. (Supported Windows Versions: 7, 8, 10, and 11).
Step 2: Run the Installer
- Once the download is complete, unzip the downloaded file.
- Double-click the file to start the installation process.
- An unknown publish warning may appear; click on More, then Run Anyway.
- Wait for a few seconds. The EasySignage App will start on your Windows-based digital signage, and a hash ID will be generated on your screen.
- You can now add your screen from the management console .
N.B.: For more information on adding your screen, please check our help page: How to add a digital signage screen .
Step 3: Create Compelling Content
After you connect your Windows screen to your EasySignage account, get creative and design eye-catching content that resonates with your target audience. From images and videos to text and animations, let your imagination run wild!
Step 4: Schedule and Publish
Easily plan your content schedule and publish it to your digital displays. Whether you want to run a one-time promotion or a recurring campaign, you can schedule playback times and duration to ensure that your content runs on time and creates maximum impact.
Step 5: Remote Access: Manage your Digital Signage Anytime, Anywhere
EasySignage makes it easy to manage your digital signage from anywhere. You can access it remotely, update content, adjust settings, and monitor performance, even when you’re not in the office. This means you can always keep your message up-to-date and reach your target audience no matter where they are.
Start on Boot
The Start on Boot enables the software to play the content automatically the moment the device is powered on or restarted. This helps businesses keep their digital signage running without requiring manual intervention.
Create a desktop shortcut for the app.
Copy the created shortcut from the desktop to the startup folder of the Windows device so the EasySignage app will start automatically every time the device boots.
The Startup folder contains shortcuts to every application that launches automatically when you sign in with your local Windows account.
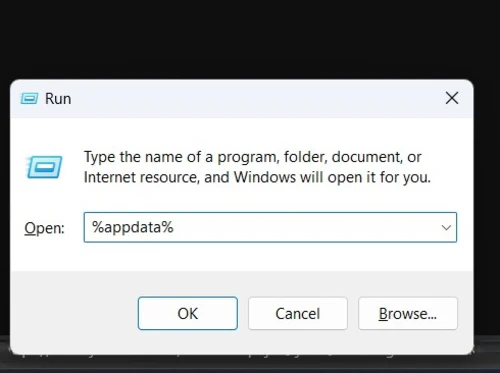
- If you cannot locate or access the startup folder, please follow the instructions below:
Press the Windows+R keys on your keyboard to bring the Run Utility.
Type in %appdata% and press the Enter key on your keyboard. This will launch the File Explorer Window.
Navigate to Microsoft → Windows → Start Menu → Programs → Startup.
Conclusion
Getting started with Windows Digital Signage is easy. You only need to define goals, select hardware and software, create compelling content, and schedule deployment. Let EasySignage be your guide!
Still have questions about the installation process? Our support team is here to assist you every step of the way. Feel free to reach out if you need any further guidance or troubleshooting assistance.