A Step-By-Step Guide to Install EasySignage on Samsung Digital Signage
A dynamic and engaging digital signage solution is crucial for a small business owner or a marketing professional. One such powerful tool is EasySignage, and if you’re using Samsung Digital Signage, you’re in for a treat.
This comprehensive guide is your roadmap to a smooth EasySignage installation on your Samsung Digital Signage device. The instructions are clear, concise, and tailored for everyone.
Why EasySignage on Samsung Digital Signage?
The answer is simple: it’s the perfect synergy of cutting-edge technology and user-friendly design. Samsung Digital Signage is a powerhouse of high-quality displays, and EasySignage is the magic wand that transforms it into a canvas of endless possibilities.
EasySignage combines user-friendly design with robust functionality, providing a dynamic platform for crafting engaging and impactful digital displays. Whether you are a pro or just starting, EasySignage empowers you to create, schedule, and manage your content effortlessly.
What You Gain by Reading This Guide
Investing a few minutes in this installation guide gives you more than technical know-how. You unlock the ability to:
Save Time: The step-by-step guide ensures a quick and hassle-free installation, saving you valuable time to craft compelling content.
Optimize Performance: Understanding the hardware requirements and installation process ensures optimal performance, maximising the capabilities of your Samsung Digital Signage.
Captivate Your Audience: EasySignage’s intuitive interface empowers you to create content that captures attention and leaves a lasting impression.
So, you’ve got this sleek Samsung Digital Signage screen, but you want to take it to the next level. Enter EasySignage, your trusty sidekick in the world of digital displays. But where to begin?
Prep Your Samsung Digital Signage
Can I use EasySignage on any Samsung Digital Signage model?
Before anything else, ensure that your Samsung Digital Signage hardware is compatible with EasySignage. Here is the list of supported models and specifications:
SSSP10 on Tizen 6.5 (2022 and newer)
- QBB series (basic) QBB: QB43B, QB50B, QB55B, QB65B, QB75B.
- QMB series (mid-range) QMB: QM43B, QM50B, QM55B, QM65B, QM75B.
- QHB series (high-end) QHB: QH43B, QH50B, QH55B, QH65B, QH75B.
SSSP6 on Tizen 4.0 (2018 and older)
- QMR-AN QM32R-AN
- QB (Basic) QBR: QB13R, QB24R, QB43R, QB49R, QB50R, QB55R, QB65R, QB75R, QB85R, QB98R. QBR-B: QB24R-B, QB85R-B. QBN: QB49N, QB55N, QB65N, QB75N, QE82N. QBT: QB98T-B.
- QM (Mid-Range) QMR: QM32R, QM43R, QM49R, QM50R, QM55R, QM65R, QM75R, QM85R. QMR-A: QM32R-A, QM43R-A, QM49R-A, QM50R-A, QM55R-A, QM65R-A, QM75R-A. QMR-B: QM32R-B, QM85R-B. QMN: QM43N, QM49N, QM55N, QM65N, QM75N, QM85N, QM98N. QMT: QM98T. QMT-B: QM98T-B.
- QH (High-end) QHR: QH43R, QH50R, QH55R, QH65R, QH75R. Window Display (OM): OMN: OM46N, OM55N. OMN-D: OM46N-D, OM55N-D.
- OH (Outdoor Signage): OHF: OH55F. OHN: OH85N, OH85N-SK, OH85N-DK, OH85N-S.
Is there a risk of messing up my Samsung display during installation?
Zero risks! The installation process is user-friendly, ensuring your Samsung Digital Signage remains as sleek as ever.
The Installation Process: A Simple Guide
How do I install EasySignage on Samsung Digital Signage?
Once compatibility is confirmed, proceed to download the EasySignage app.
Tizen 4.0:
- Option 1: If Samsung SSSP is already in use:
Press HOME on the remote control
Go to URL Launcher Settings
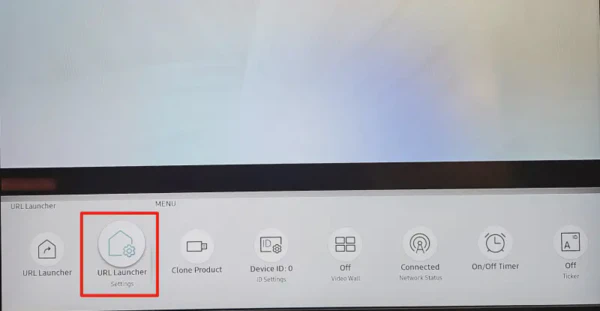
Uninstall any previously installed apps.
Copy the URL of the EasySignage app and paste it: https://app-ds.net/t
Click on DONE.
EasySignage App is now installed, and it will start automatically.
When the app starts, a hash code will display on the screen.
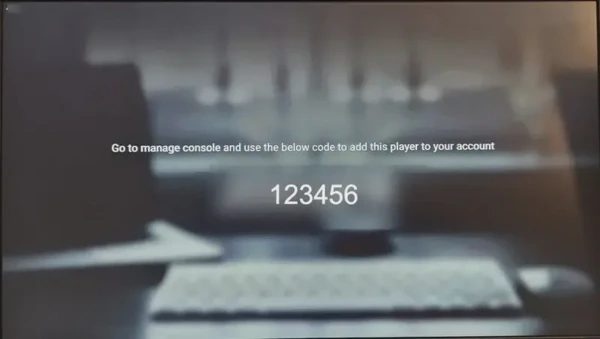
- Go to the management console manage.easysignage.com and add your screen.
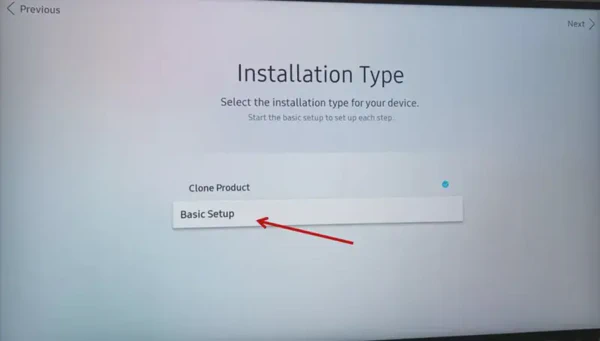
- Option 2: If Samsung SSSP is brand new or after a factory reset: The brand-new device will start with an initial setup; follow the instructions below:
- Choose Basic Setup in the installation type page.
Select a language.
Choose the orientation (Landscape or Portrait).
After adding the screen, you can change the orientation remotely from the management console.Set Auto Power Off to Off.
Set your network connection (wireless or wired)
In the Play Via page, choose Play via URL Launcher
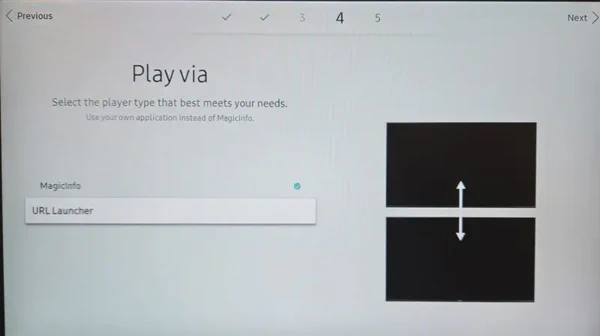
Copy the URL of the EasySignage player for SSSP and paste it: https://app-ds.net/t
Click on DONE
Choose Skip in the setup of Connect to RM Server
Set the correct date and time
The Setup is complete. EasySignage is ready to use.
EasySignage App is now installed, and it will start automatically.
When the APP starts, a hash code will display on the screen.
Go to the management console manage.easysignage.com and add your screen.
Tizen 6.5
- Option 1: If Samsung SSSP is already in use:
From the remote control, press HOME
From the menu, choose Custom APP
If a previous application is installed, it will show near App management.
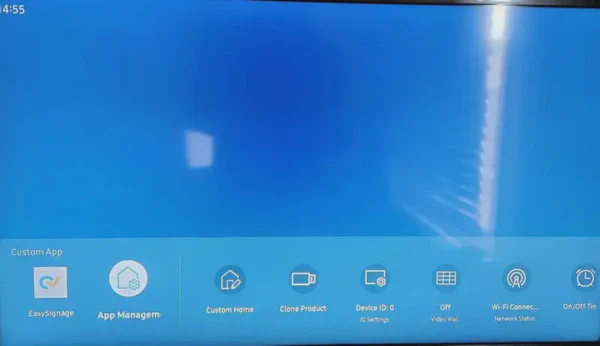
Choose it and click Uninstall.
Choose to Install Custom App.
Copy the URL of the EasySignage App and paste it: https://app-ds.net/t
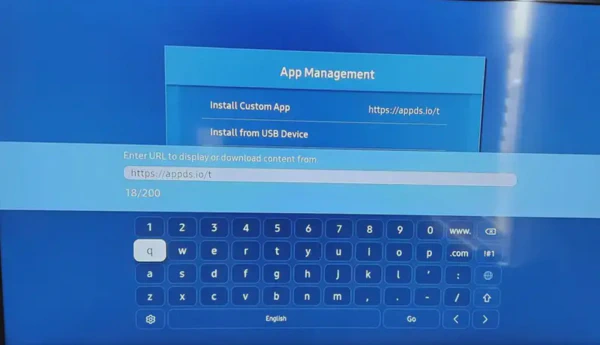
The App will download and start automatically
When the app starts, a hash code will be displayed on the screen
Go to the management console manage.easysignage.com and add your screen
- Option 2: If Samsung SSSP is brand new or after a factory reset:
Select your Language in the welcome screen
Set your network connection (wireless or wired)
Review and Accept the Privacy Notice
In Installation Type, choose Basic Setup
Choose the orientation (Landscape or Portrait).
After adding the screen, you can change the orientation remotely from the management console.Under Player Selection, choose Custom App
Copy the URL of the digital signage Application and paste it: https://app-ds.net/t
Set Skip for RM Server Setup
Disable Auto Power Off mode
Set the correct date and time
Choose a PIN
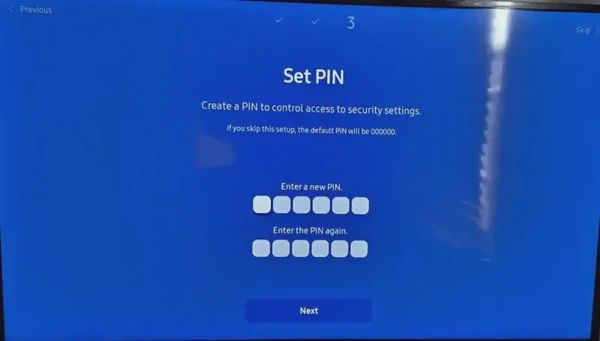
On the Remote Control, press on Menu
Choose Custom App
The App will download and start automatically
Go to the management console manage.easysignage.com and add your screen
Install From USB Flash Drive
Prepare the USB flash drive on a PC
Plug your USB Flash drive into a PC
Download the following file under the USB root folder: CLICK TO DOWNLOAD FILE
Unzip the file under the root of the USB Flash drive ( DO NOT create a folder under the USB). If the USB Flash drive is F:/, the folder should look like this: F:/SSSP
It will create a folder named SSSP. Under this folder, there are two files (EasySignage and sssp_config.xml), as follows:

USB Setup on SSSP6 - Tizen 4.0 Display:
Insert your USB Flash drive into your Samsung display
On the remote control, press the HOME button
Select URL Launcher
Select Install From the USB Device
Enter the PIN
The EasySignage player will start to download and install automatically
The app will launch once the download is complete
When the app starts, a hash code will be displayed on the screen
Go to the management console manage.easysignage.com and add your screen
USB Setup on SSSP10 - Tizen 6.5 Display:
Insert your USB Flash drive into your Samsung display
On the remote control, press the HOME button
Select the APP Management
Select the Install from the USB Device
Enter the PIN if required
The EasySignage app will start to download and install automatically
The app will launch once the download is complete
When the app starts, a hash code will be displayed on the screen
Go to the management console manage.easysignage.com and add your screen
For more detailed information on installing EasySignage on Samsung Digital Signage, please refer to our Help Page.
Navigating the EasySignage Playground
Let’s explore the EasySignage interface. Picture it as your digital art studio, where you can craft and schedule content effortlessly. EasySignage empowers you to create content that wows your audience.
Step 1: Creating an account on EasySignage
Do I need an account to use EasySignage on Samsung Digital Signage?
Yes, creating an EasySignage account is essential for accessing and utilising the full range of features on Samsung Digital Signage.
If you haven’t already, sign up for an EasySignage account. The process is quick, requiring only basic information. Once registered, log in to your account.
- Open your browser on a PC, and go to the management console
- Fill up the form with your email and password
- Click Sign Up
- Verify your account with the verification code sent to your Email
- Or just log in with your Google account, Microsoft account, or Facebook
- Check the Registration and login details on our Help Page
Step 2: Content Creation 101 - Where Your Imagination Takes Flight
With EasySignage successfully installed, it’s time to add your content. The user-friendly interface allows you to effortlessly upload images, videos, and other media.
Can I add interactive elements to my content using EasySignage?
EasySignage supports interactive features, turning your display into an engaging experience for your audience.
Are there templates available for quick content creation?
Indeed! EasySignage offers a treasure trove of ready-made templates, making content creation a breeze, even for the creatively challenged.
- After you sign up on EasySignage, go to the management console
- Click on PLAYLISTS in the navigation bar
- Click ADD PLAYLIST
- Enter the name of the Playlist and choose a team, then click SAVE
- Choose a layout for your playlist and start adding your media
- For more detailed information, go to the PLAYLISTS page
Step 3: Scheduling Like a Pro - Set It and Forget It
Have you ever wished you could automate the entire process? Well, you can! EasySignage’s scheduling feature allows you to set up your content calendar in advance. That means more time to focus on what matters while your display works magic.
Plan your performances like a seasoned director. Schedule your content for specific times, ensuring your message reaches the right audience at the right moment.
Step 4: Adding Your Screen
Adding a screen on EasySignage is a breeze. Once you install the app on your Samsung Digital Signage, a hash ID will be displayed on your display.
Go to the management console to add your screen
Navigate to the SCREENS tab
Click on ADD SCREEN
Enter the hash ID displayed on your screen, and add a name to the screen.
Now, you must add the content you created for your screen to display. Click on the Set Media Source next to your Screen Name.
Click on the playlist you want to assign to your screen
And then hit the Publish button
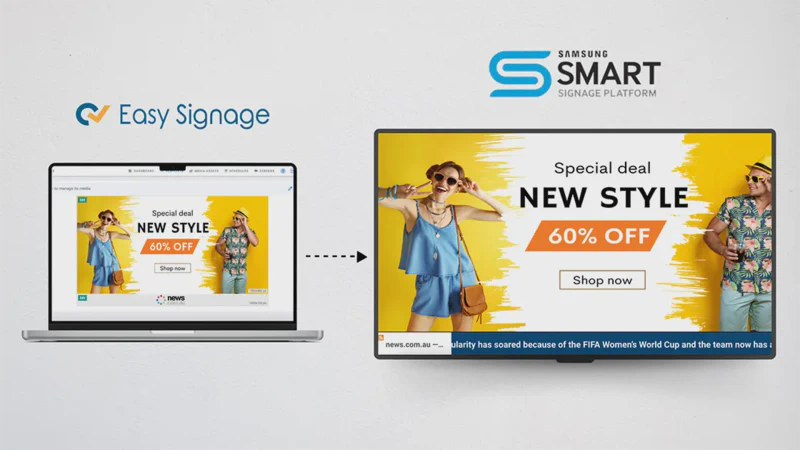
Now, you can enjoy captivating content on your Samsung digital display that showcases your brand’s message in the most engaging way possible.
Q&A: Addressing Your Concerns
Q1: Will installing EasySignage affect the performance of my Samsung Digital Signage?
A: Not at all. EasySignage is designed to enhance, not hinder, the performance of your Samsung Digital Signage. The integration is seamless, ensuring a smooth and efficient operation.
Q2: Can I use EasySignage on multiple Samsung Digital Signage displays?
A: Absolutely. EasySignage is scalable, allowing you to manage and control multiple displays from a single platform.
Q3: Is technical expertise required for the installation process?
A: No technical expertise is necessary. The installation guide provides clear, step-by-step instructions, making the process accessible to everyone.
Q4: What types of content can I display using EasySignage?
A: EasySignage supports a variety of content, including images, videos, web pages, and more. The platform is versatile, catering to your unique display needs.
The Grand Finale
As we wrap up this guide, pat yourself on the back - you’re now the maestro of your Samsung Digital Signage symphony.
You’ve gained the power to transform your Samsung Digital Signage into a mesmerising visual experience. From installation to content creation, you’re now equipped with the knowledge to make your digital signage journey a roaring success.
So, what are you waiting for?
Your Samsung Digital Signage is ready for its close-up, and EasySignage is here to ensure it steals the show every time. Your audience deserves the best – give them an experience they won’t forget.